In this article we will share our experience of porting an existing Unity SteamVR game to the Oculus Quest platform, while maintaining a common code base. The article might be helpful for indie developers and studios which are planning to port their existing VR product or just want to start a new cross-platform product.
This is the first article of 3, here are the link to the other two:
- Part II: Optimization techniques for porting the Unity SteamVR game to Oculus Quest.
- Part III: Automated artifact building both for SteamVR and Oculus Quest.
What apps can be ported and share the codebase?
Not all projects can be ported from SteamVR to Oculus Quest and use the same code. Moreover, not all products might be running on Oculus Quest without sacrificing their essential features. Here the short checklist of things you need to confirm about your existing game when considering the port:
- It doesn’t use features bound to Steam or SteamVR: Vive Tracker, network framework, social or other Steam features, … or they can be disabled without an issue.
- There are not too many objects in the player's FOV.
- There are no high poly models or they can be simplified without an issue.
- There are no massive physics simulations.
- There are no post-processing effects or they can be removed.
- It uses Single Pass Stereo Rendering.
It’s hard to say how many objects in the FOV are too much, but that number can be estimated by taking into account the following Oculus requirements:
- No more than 50 - 100 draw calls per frame.
- No more than 50 000 - 100 000 triangles or vertices per frame.
- 72 FPS.
So the hardest part is to heavily optimize the project to have it running on Oculus Quest (which is based on the Android mobile platform). If you don’t feel confident of reaching such tough limitations without sacrificing essential features of the product, you might need to rethink your porting plans.
Also, remember that to publish the product in the Oculus store you’ll have to send a proposal to Oculus prior to any work.
How to configure Unity for Oculus Quest
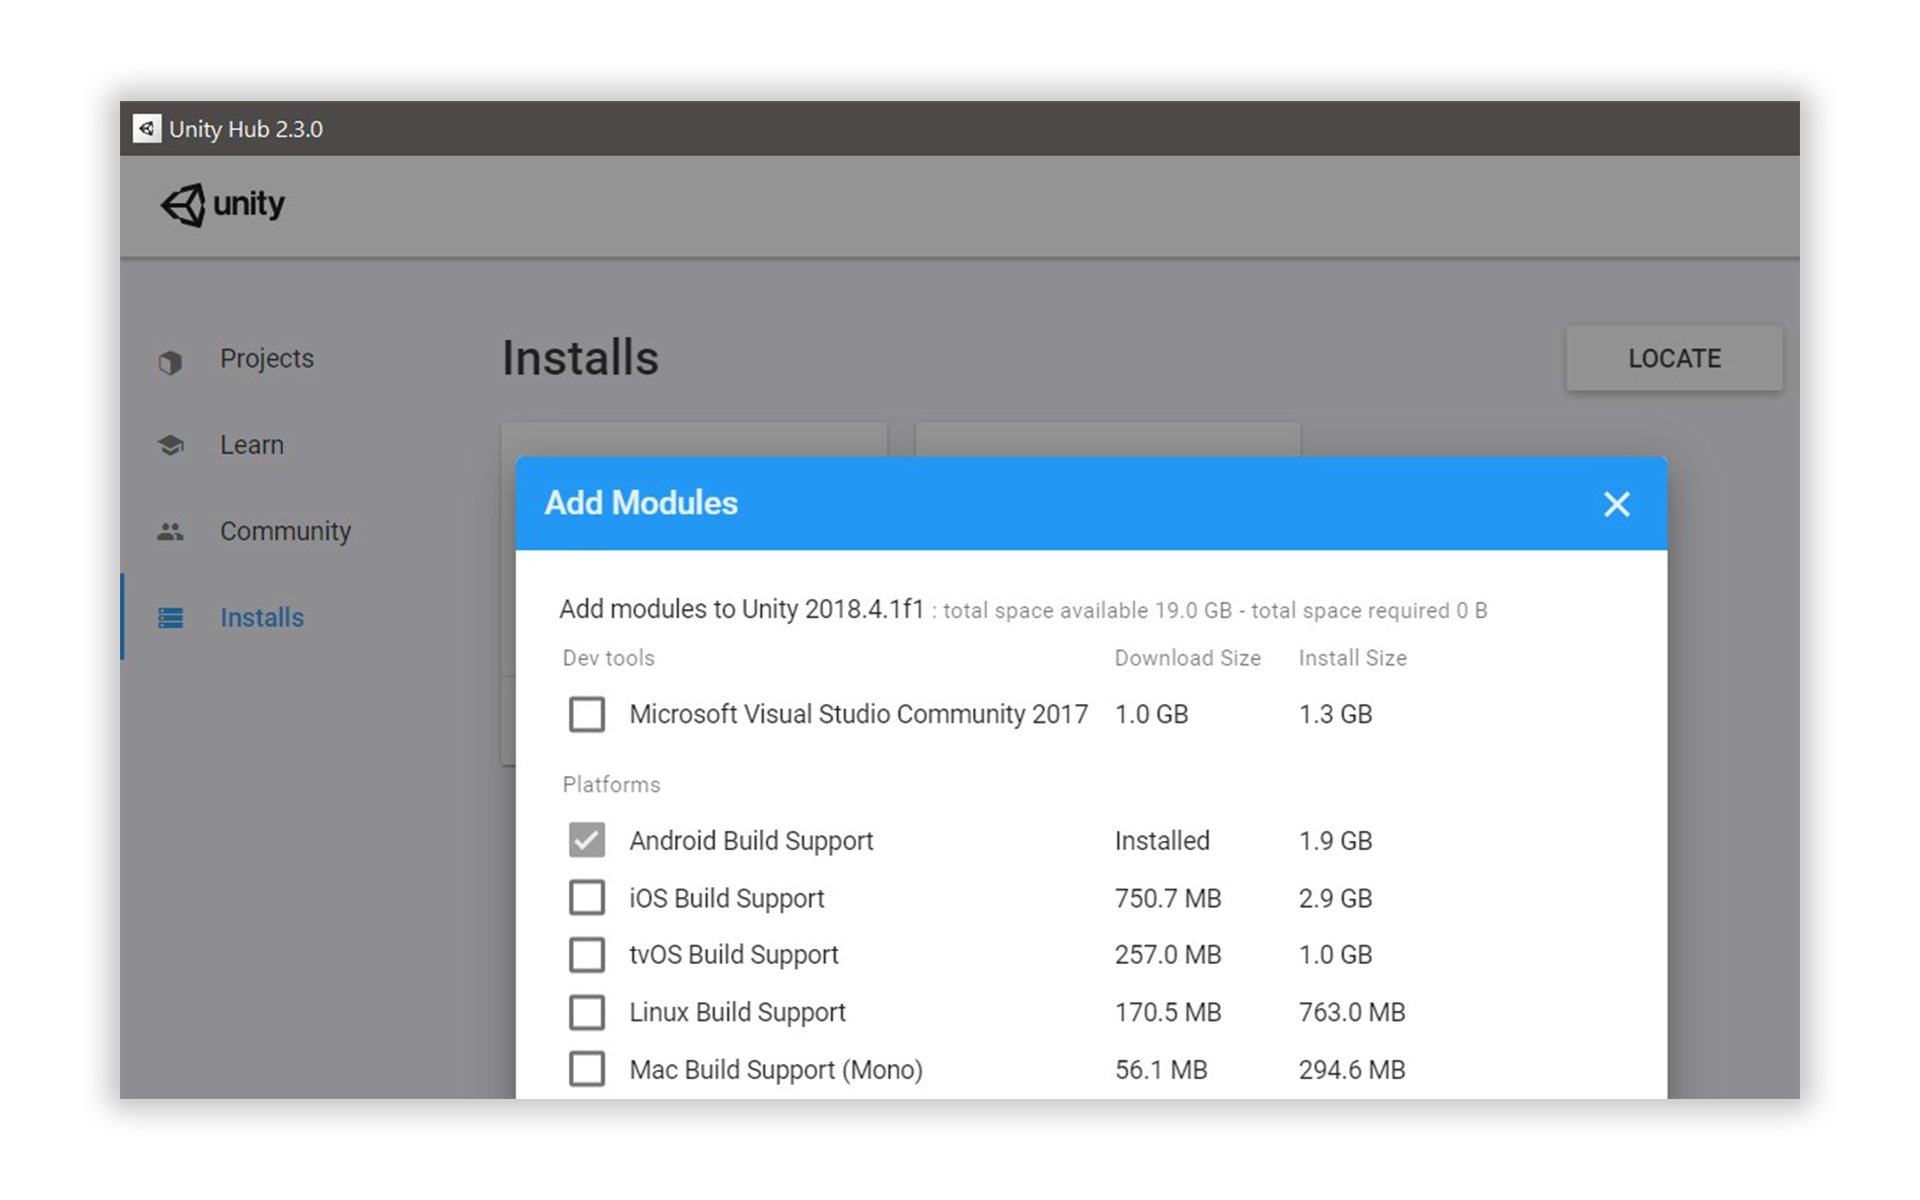
The installation process will depend on the Unity version, but in general it should go as follows. First, Android Build Support should be installed because Oculus Quest platform is based on Android.
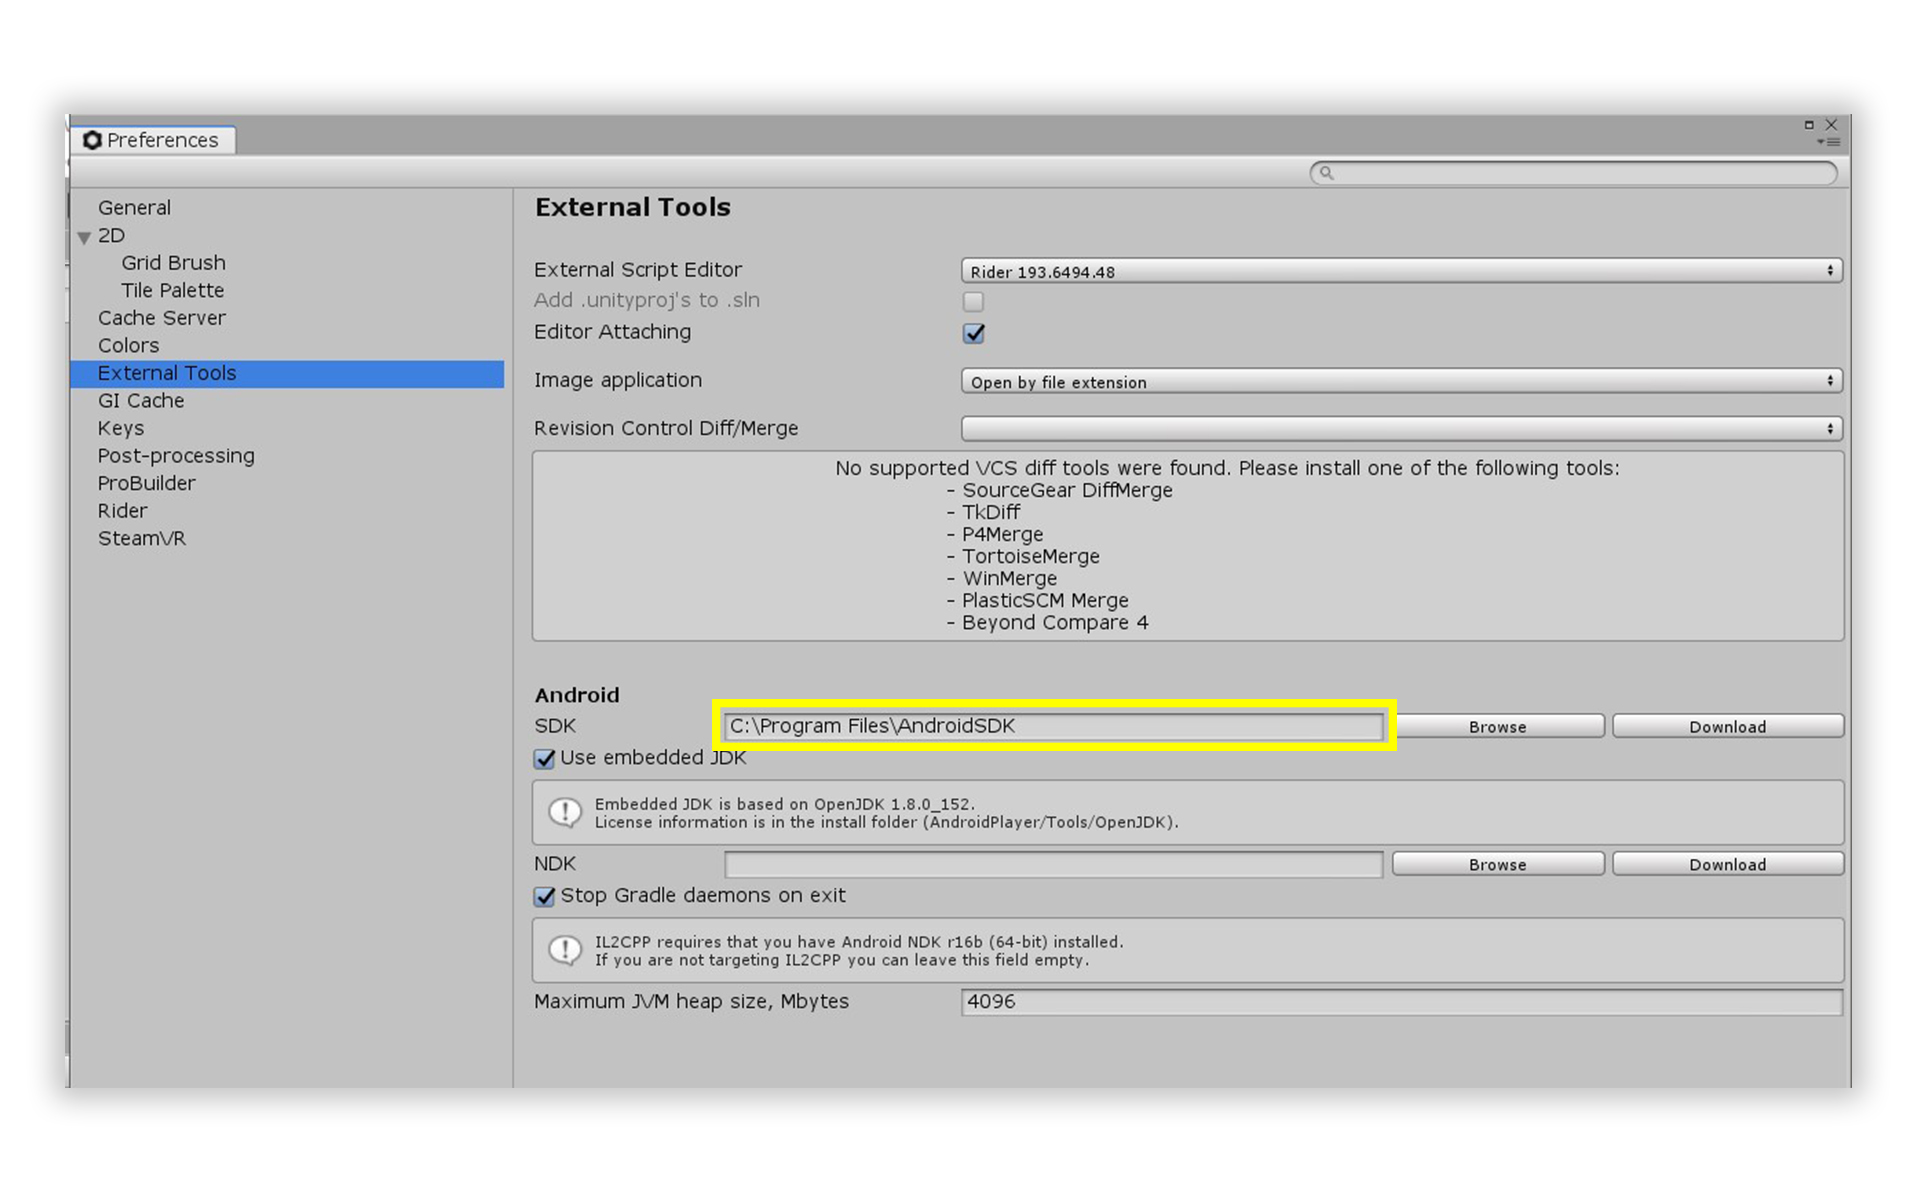
There is a complete Android SDK & NDK included in the latest Unity. At the moment of writing (April 2020) we are using Unity 2018.4.1f1 that for some reason doesn’t include an Android SDK. So we had to install Android SDK 28 separately, but it’s highly likely that all later versions will work fine too. All required Android SDK files can be found in Unity 2019 or downloaded from the official repo: platform tools, build tools, platform.
Oculus Integration package should be installed in Unity.
The next step is to activate developer mode on the Oculus Quest device which is required to build and install custom apps and games. It can be done this way. At this step you also will be forced to create your org for Oculus platform which will be used to publish the product to the Oculus Store.
Next you should create an app at Ocuslus API. The id of the created app is required to configure the Oculus Integration package in Unity. The app id should be set in Oculus->Platform->Edit Settings. In case you plan to use a microphone, bluetooth or other devices you will have to create and configure AndroidManifest using Oculus Integration package utilities.
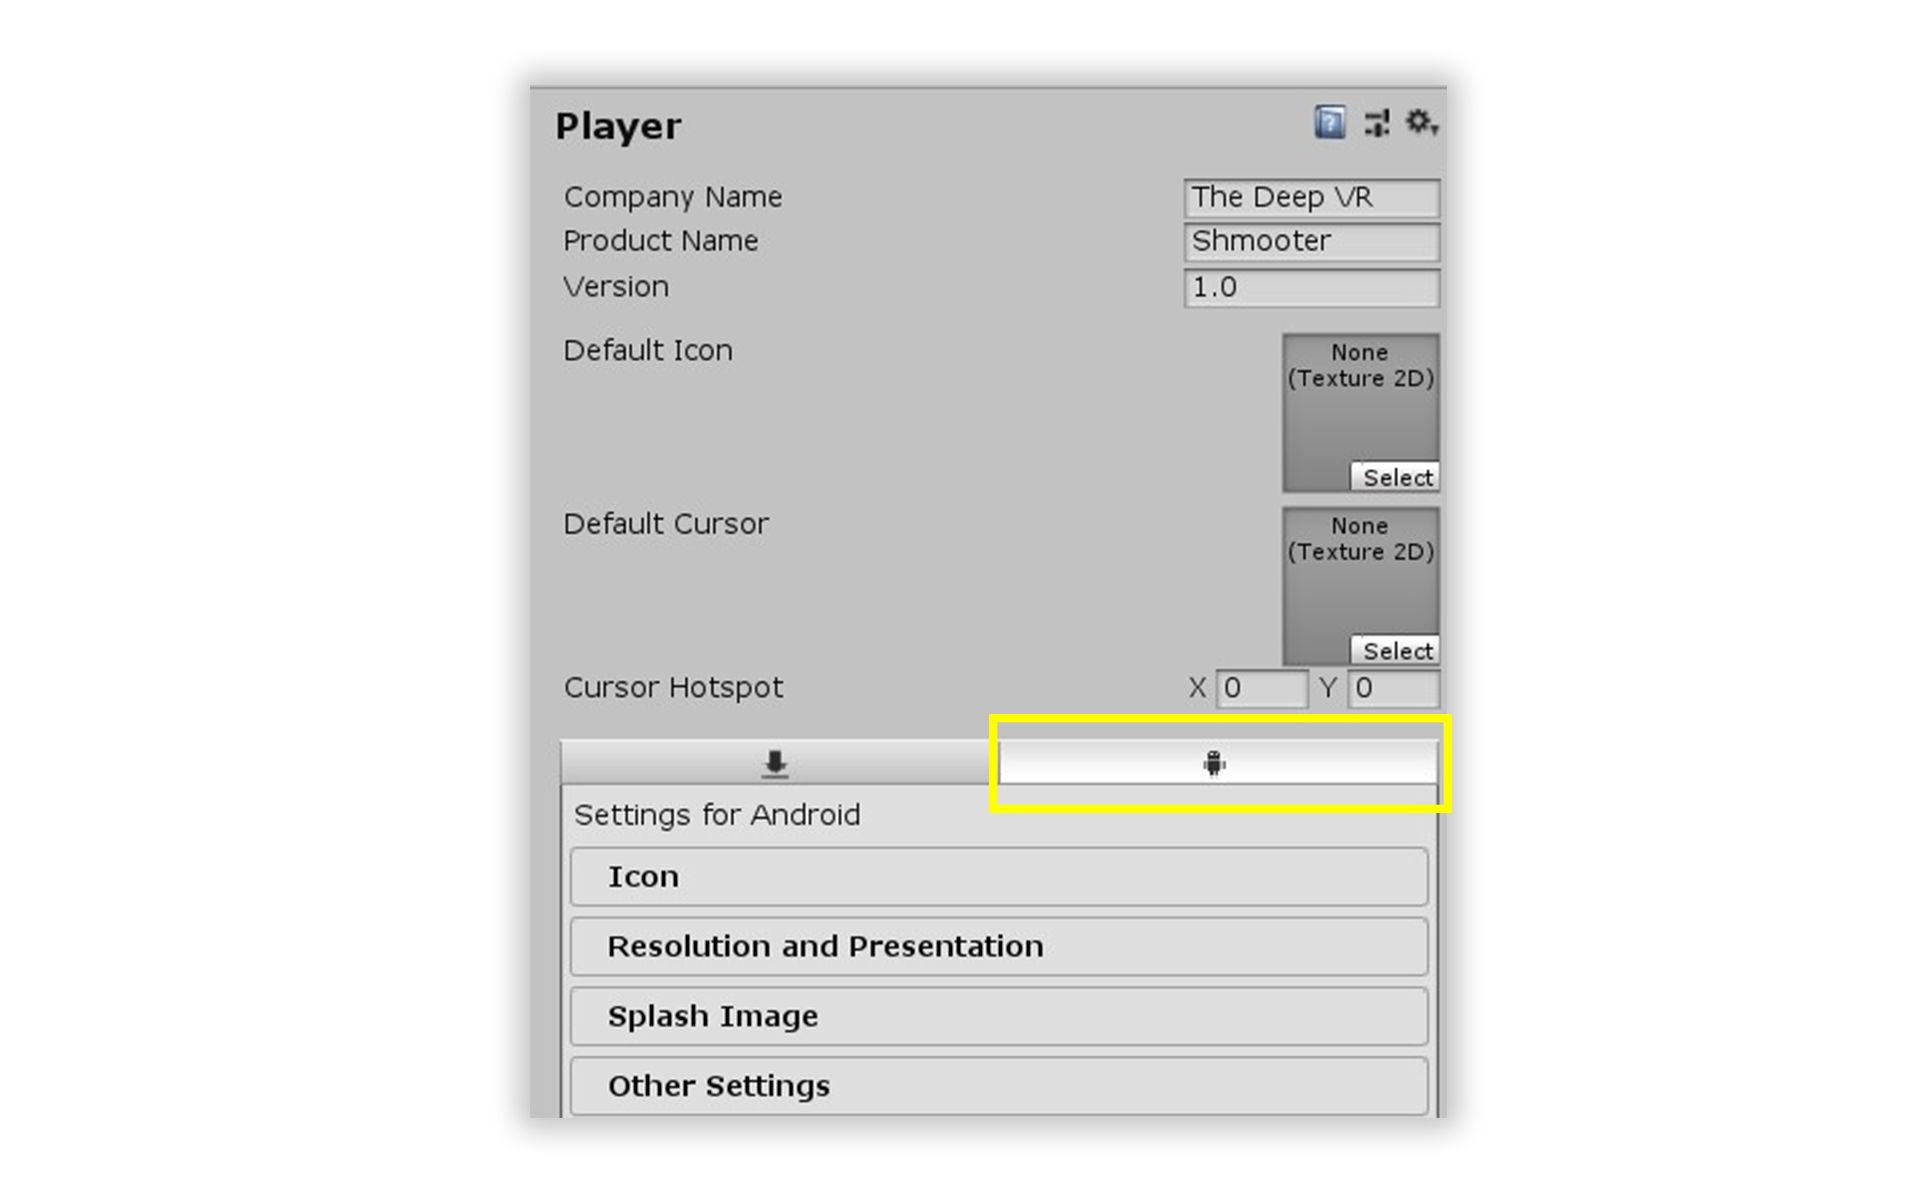
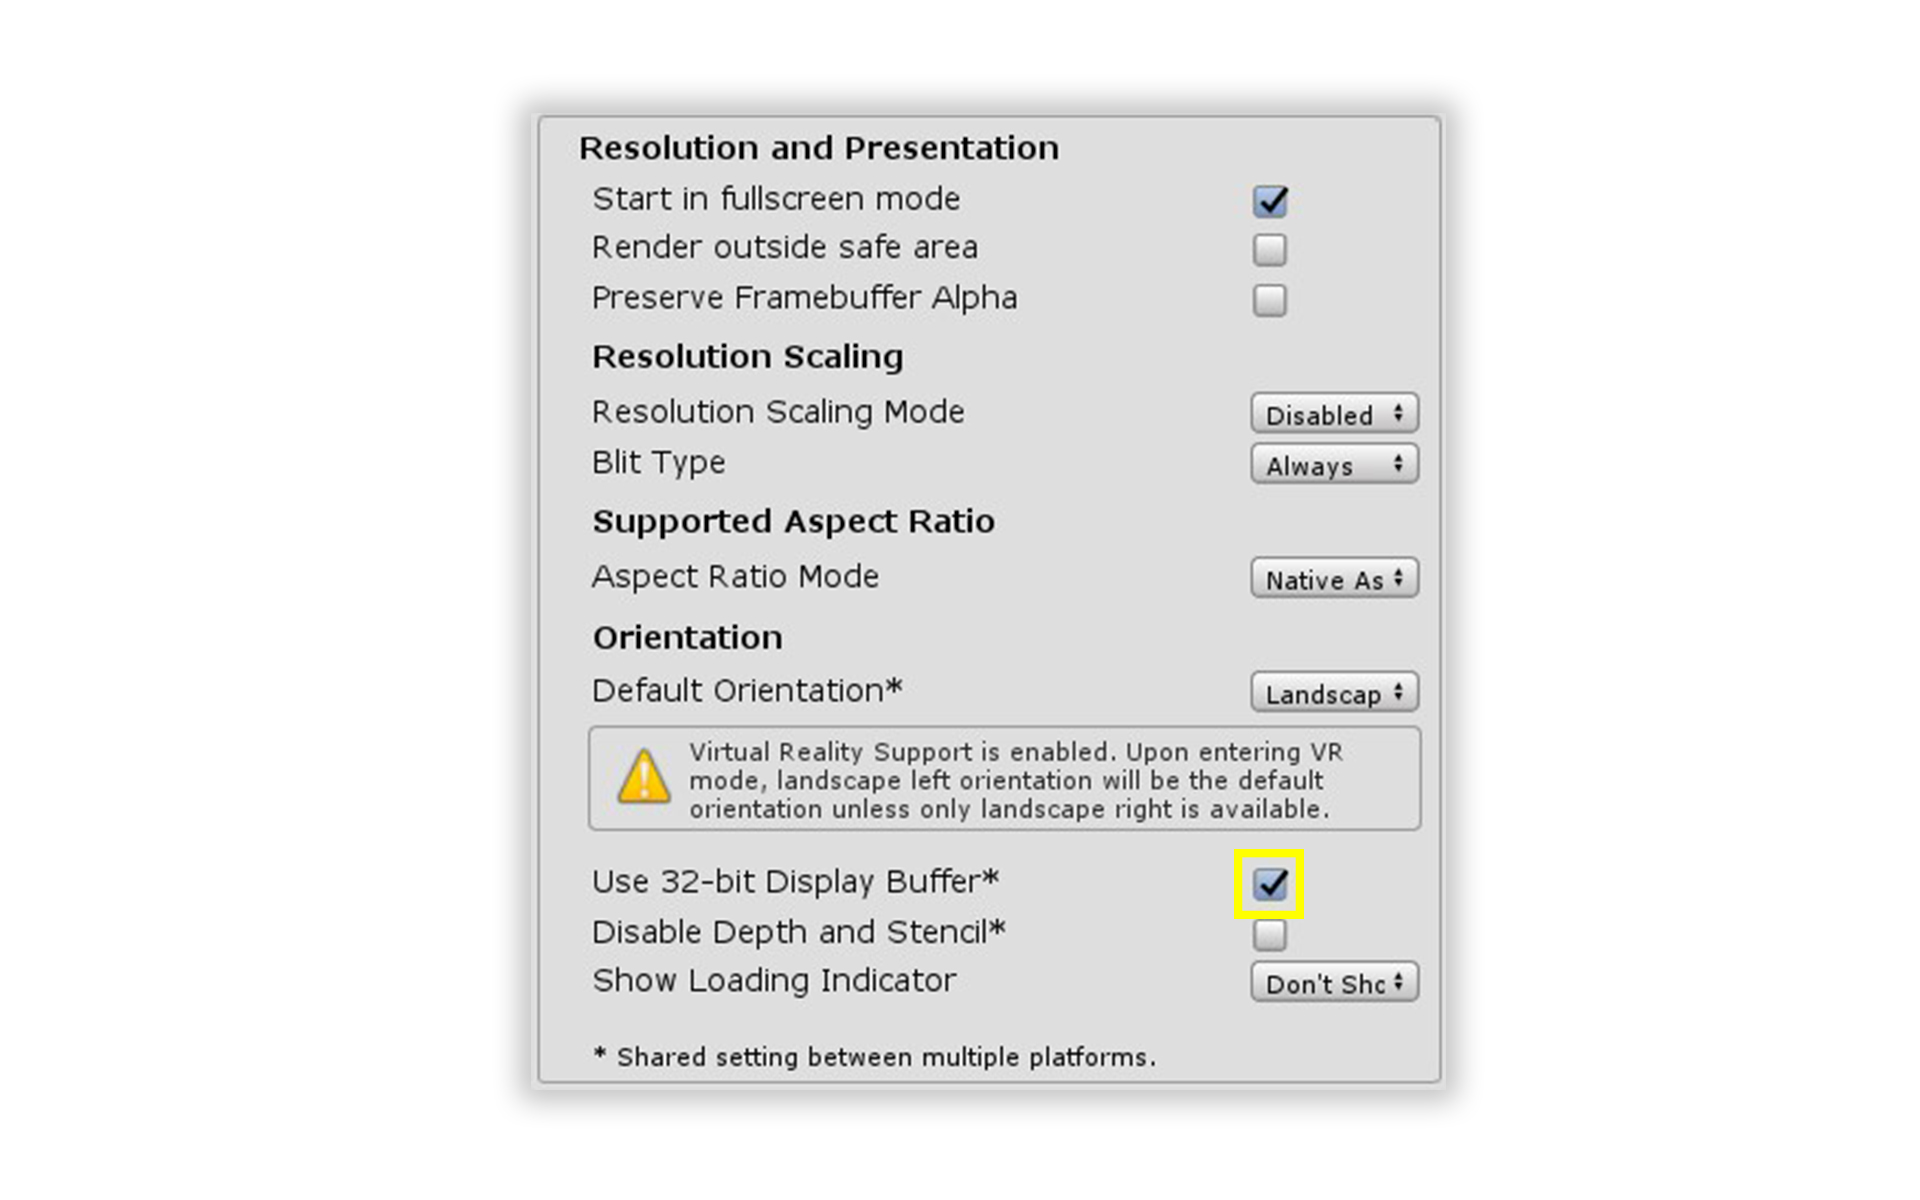
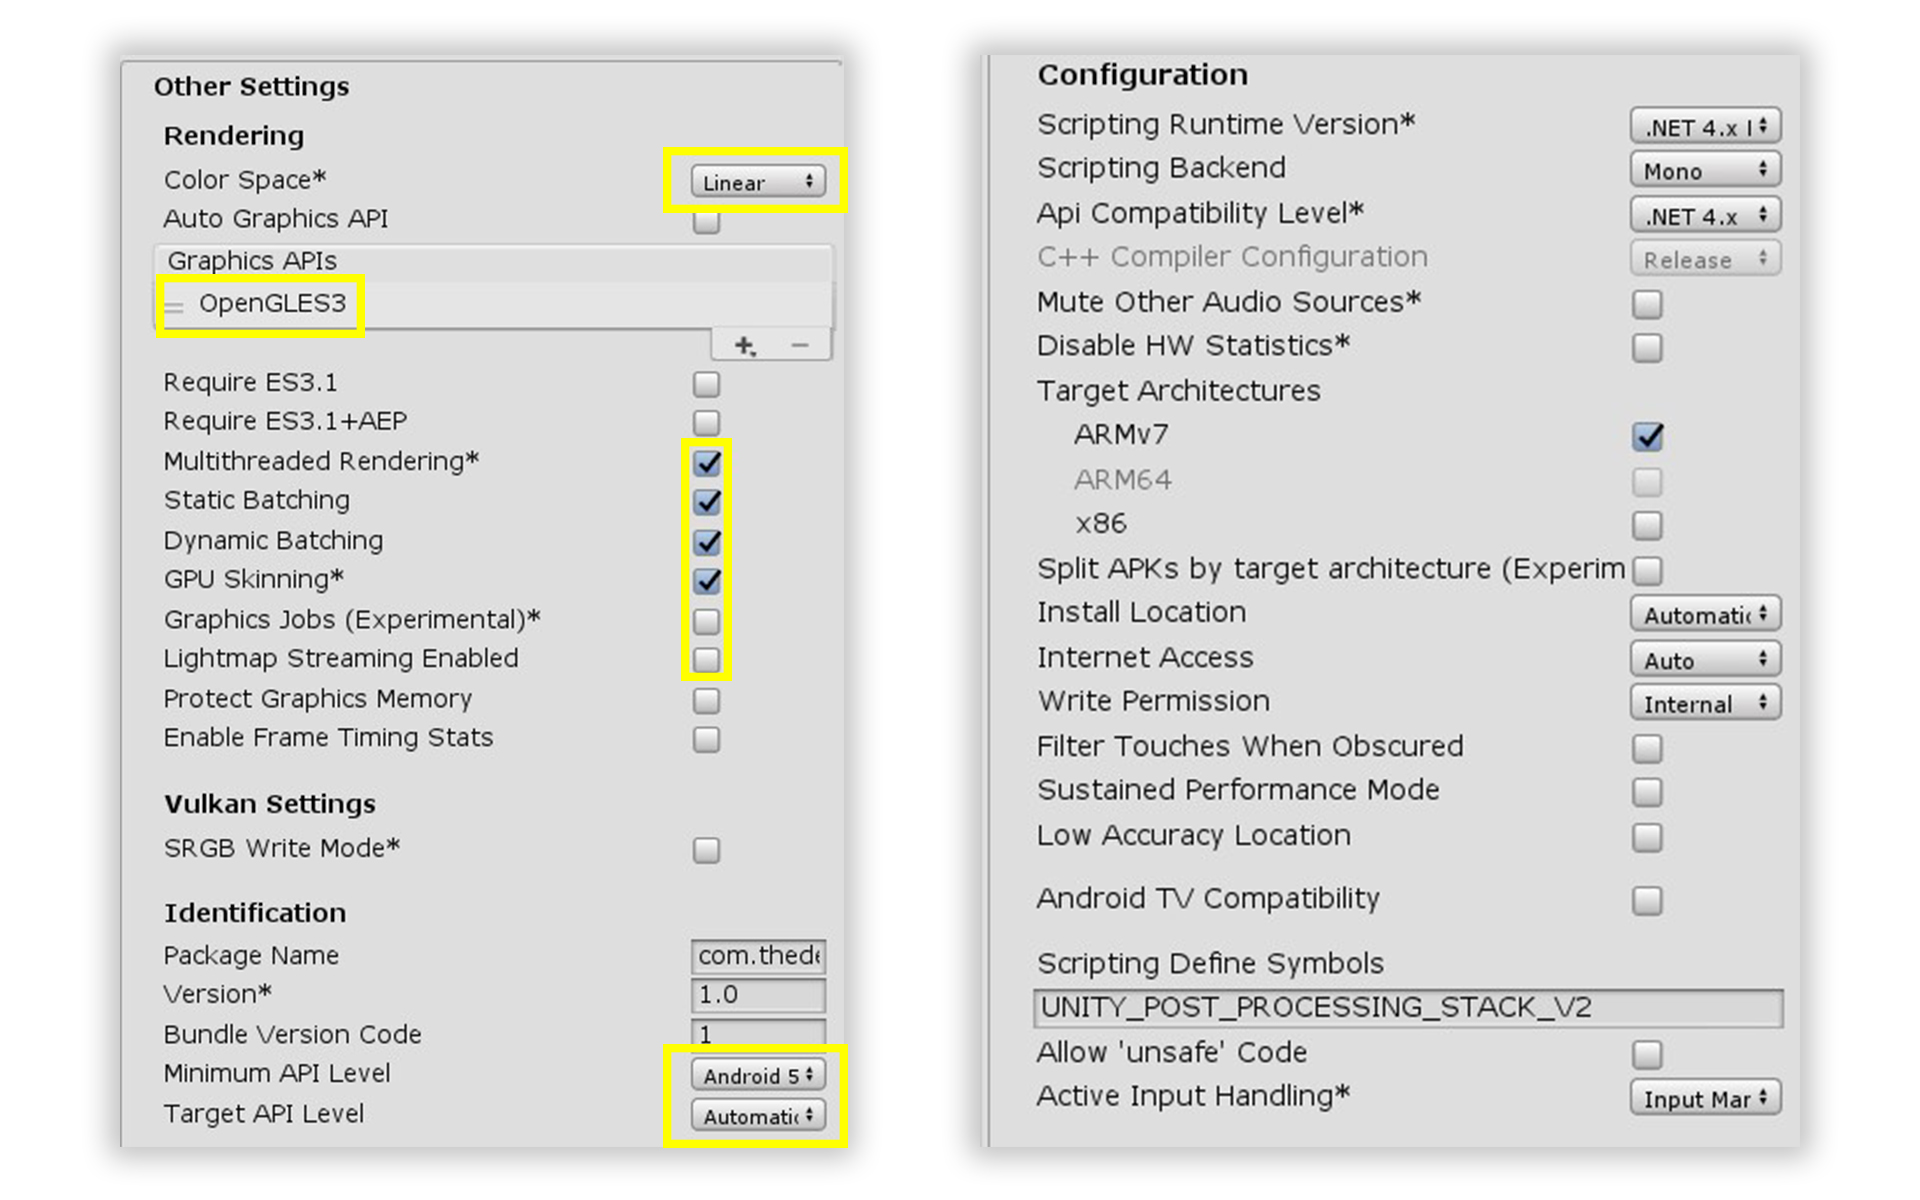
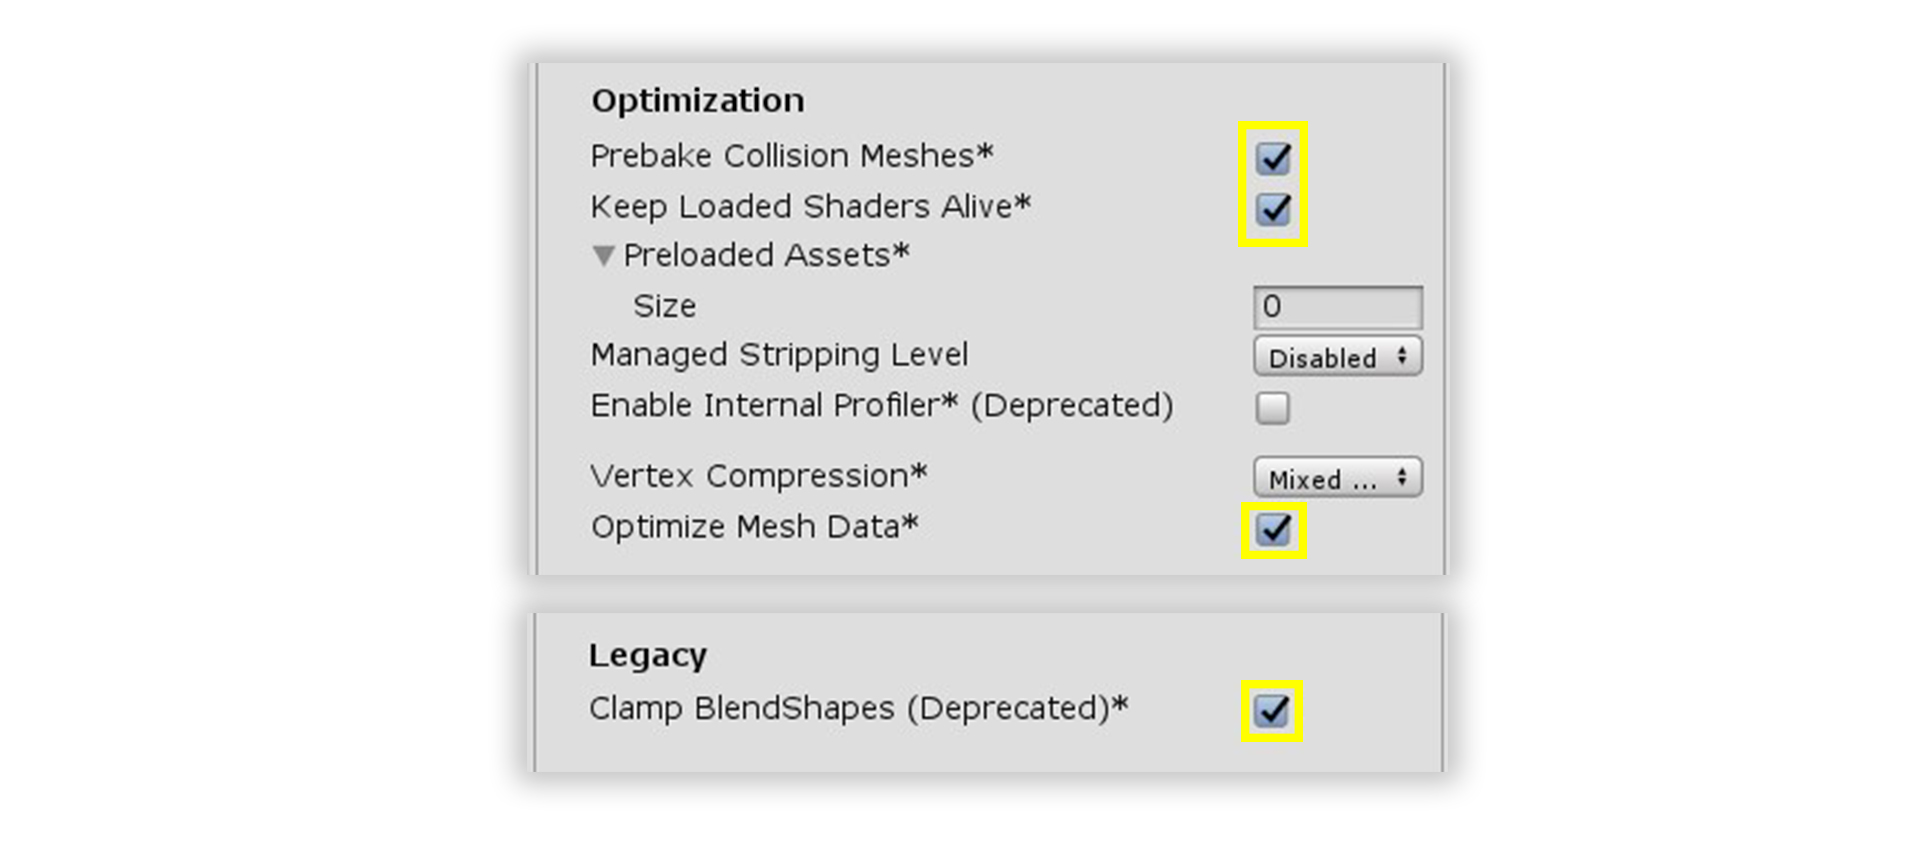
To set up the Unity Player you go to Edit->Project Settings->Player and switch to the Android tab. Take note - some parameters are shared between platforms so it’s impossible to change them individually.
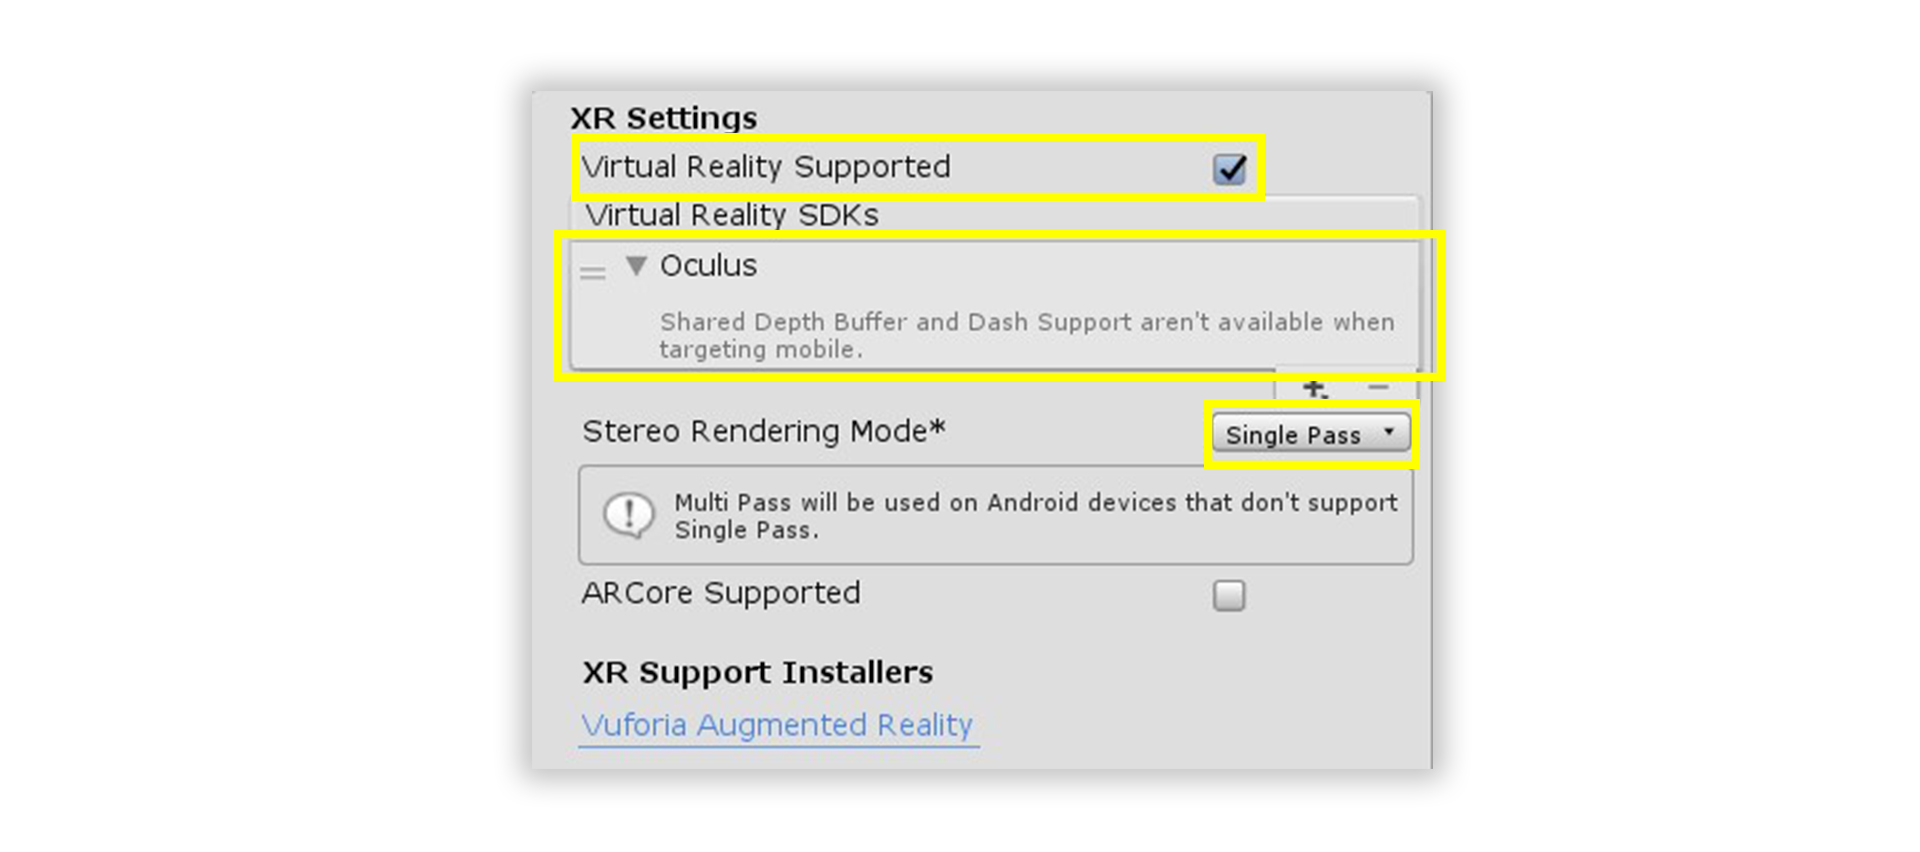
Usually the Oculus Integration package automatically adds Oculus VR SDK in XR Settings in the Standalone/Windows tab. So if your product doesn’t support the PC Oculus platform you must be sure there is no Oculus VR SDK specified in XR Settings of the Standalone/Windows tab. Otherwise the SteamVR build will be broken.
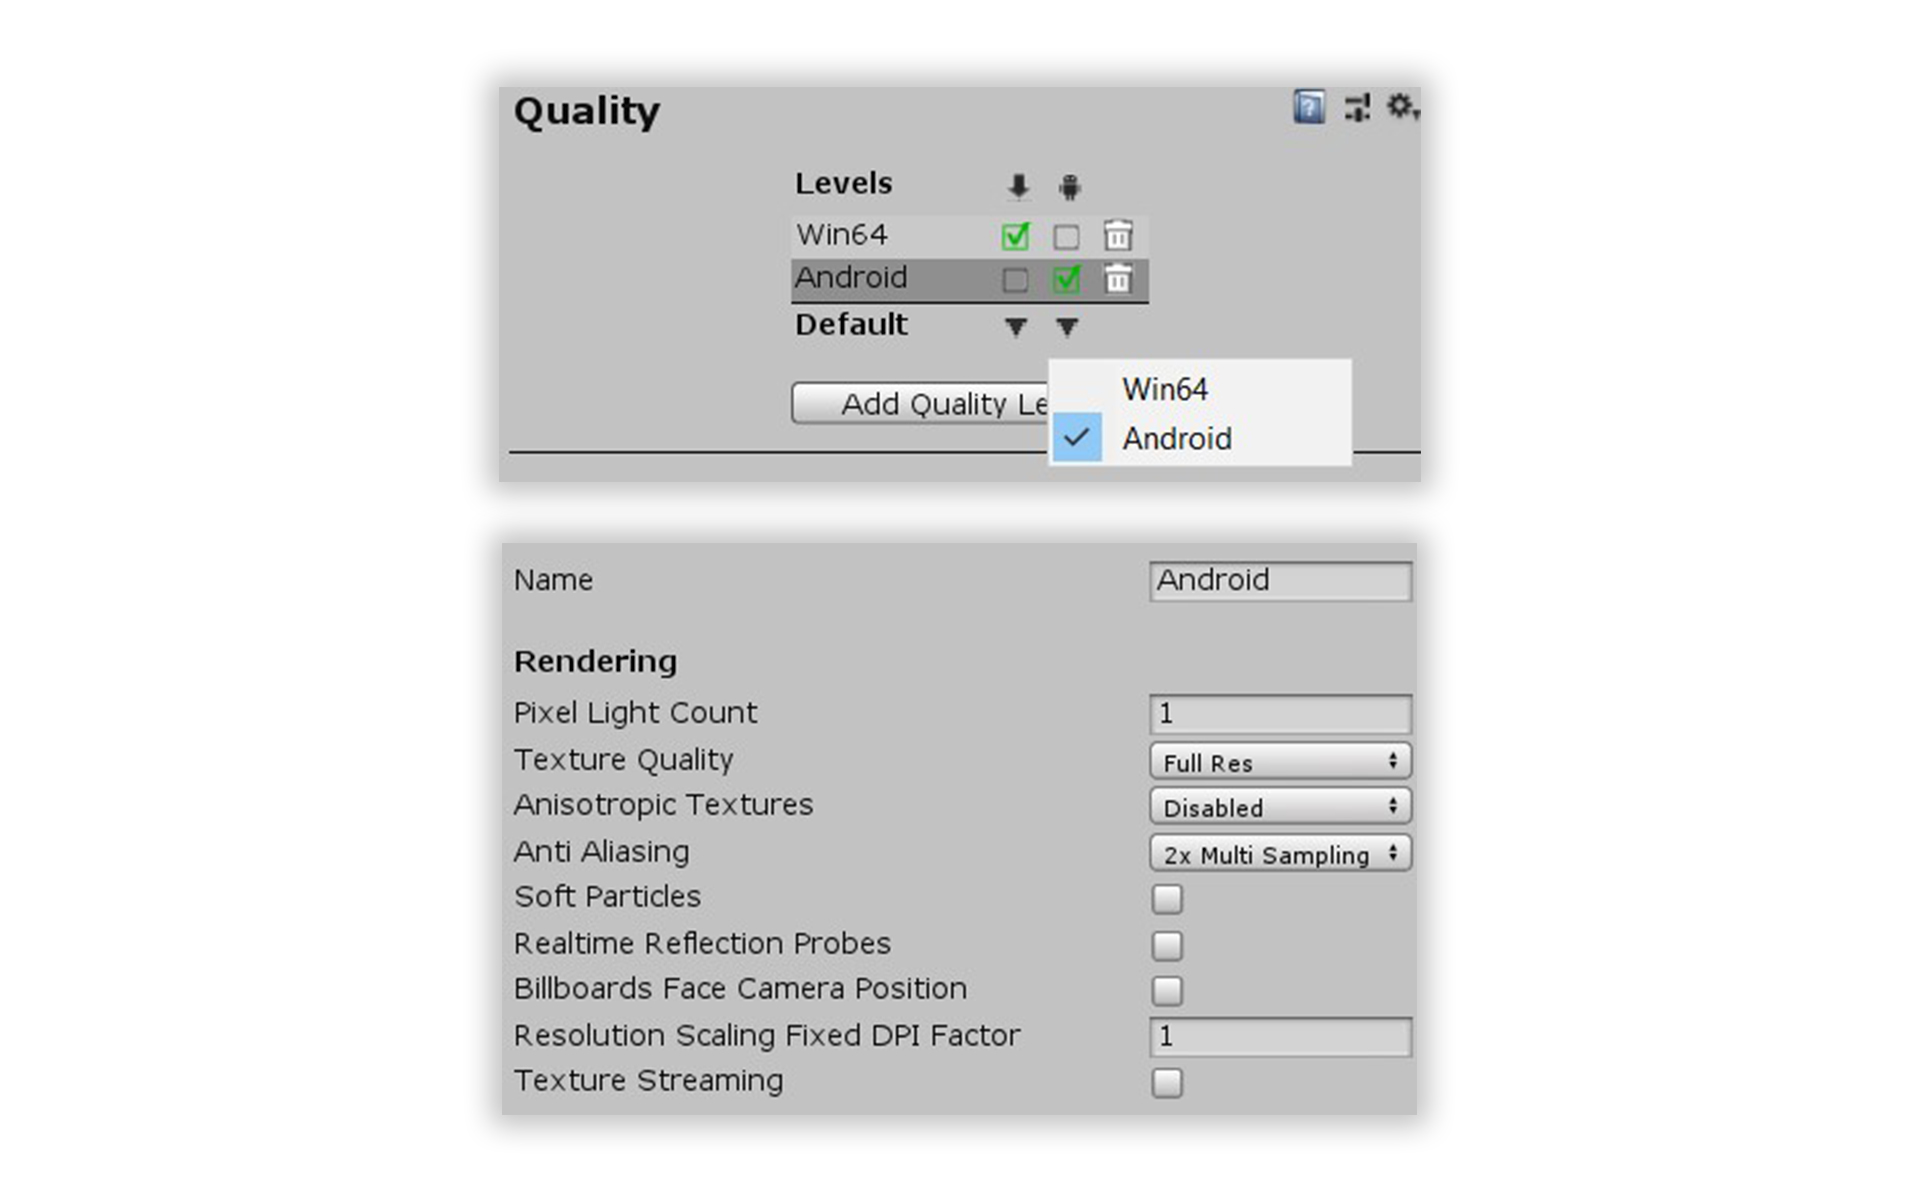
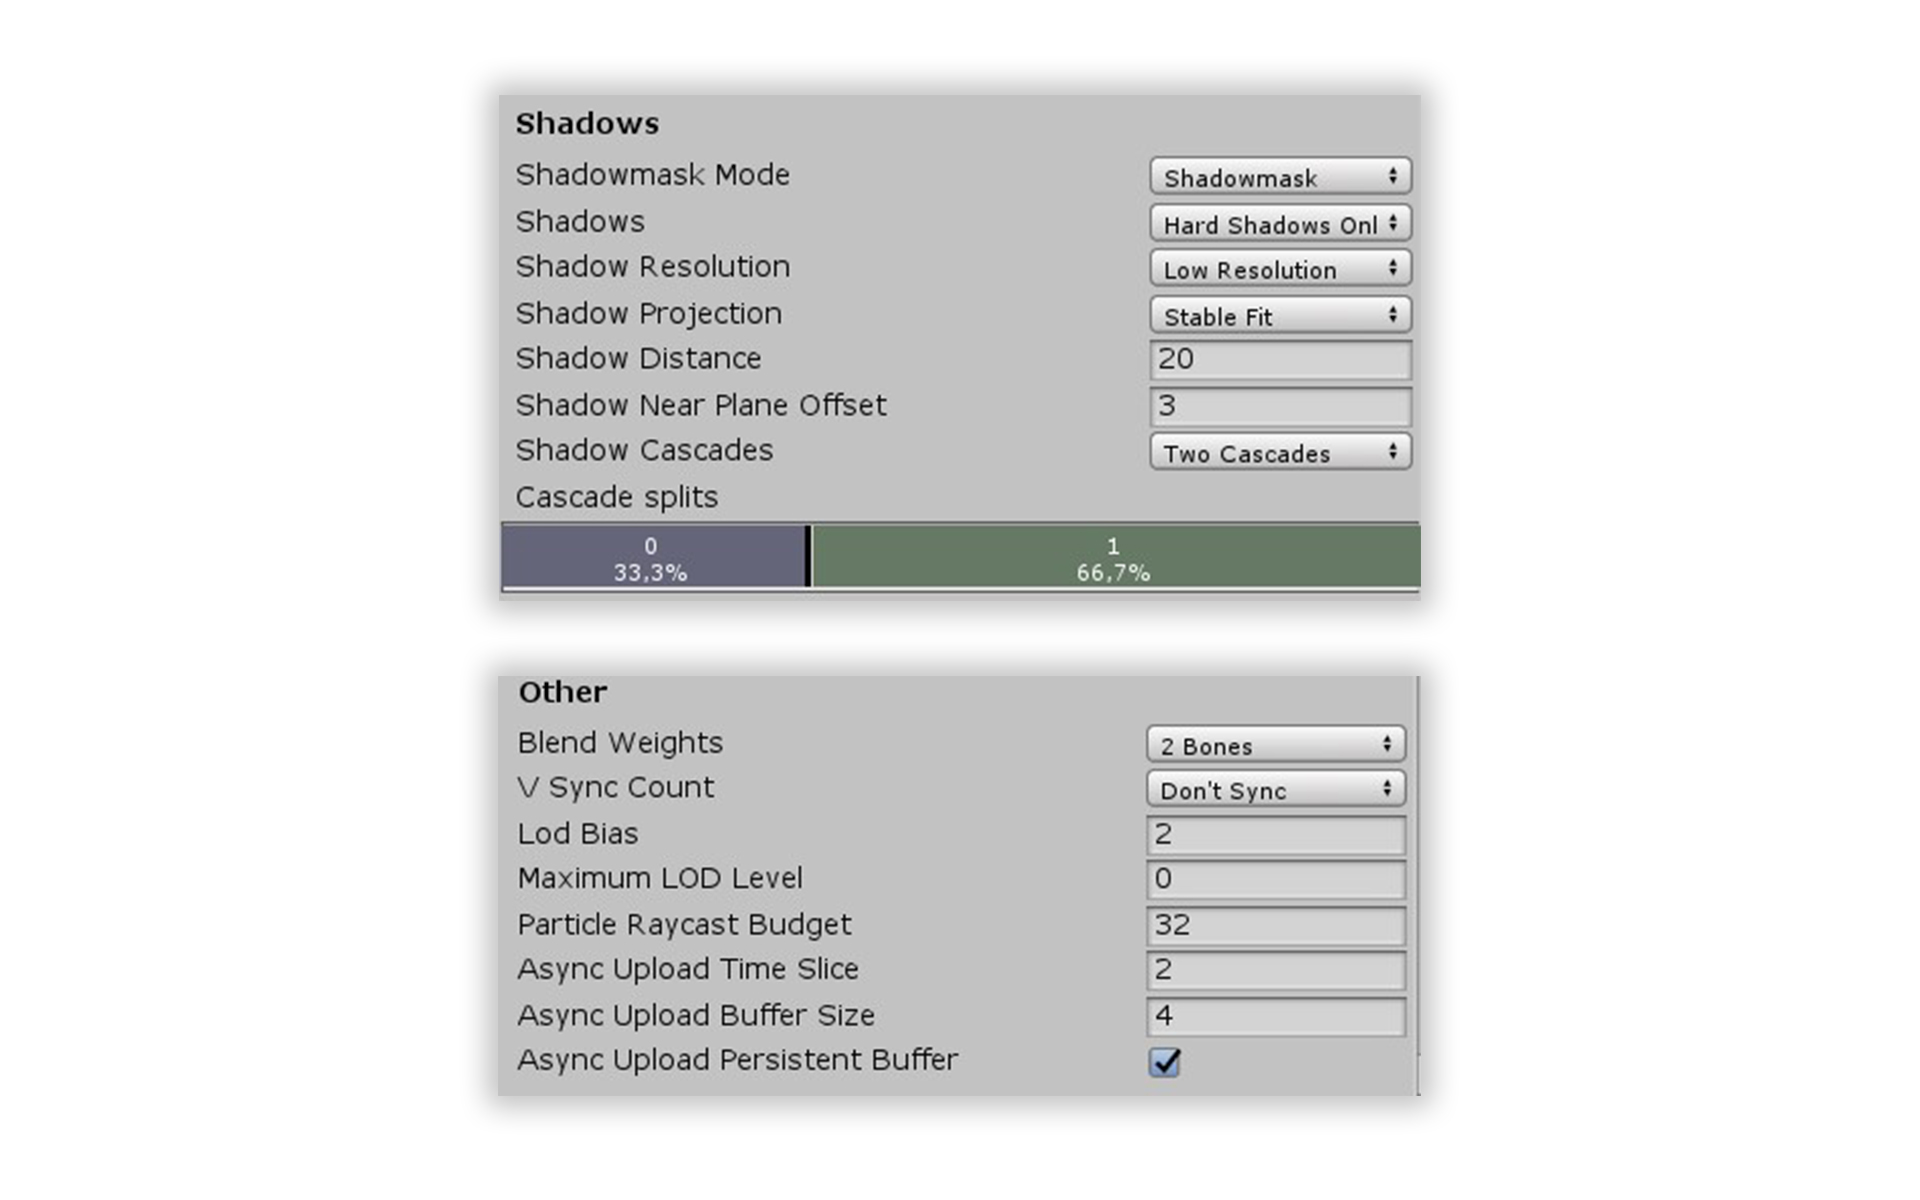
To configure the quality settings you have to visit Edit->Project Settings->Quality and make sure there is at least one level set for each platform and that correct levels are chosen as default. Of course, you choose the parameters that suit you best, but the following ones can be used as a starting point:
How to run platform specific code only for Oculus Quest or SteamVR
To check if the code running on Oculus Quest or on a PC with SteamVR you can check the UNITY_ANDROID symbol with a compiler directive. However, if the code is running directly from the Unity Editor (e.g. running a non-VR host), it is better to check for UNITY\_ANDROID && !UNITY_EDITOR:
Please note - the above only works for distinguishing between SteamVR and Oculus quest and is not enough in case other mobile VR platforms or the PC Oculus platform is used. In that case you might want to check both UNITY_ANDROID and XRSettings.loadedDeviceName.
What is inside Oculus SDK
Oculus SDK is quite powerful and can be split into 2 parts:
- General functionality: Rendering, Input and Haptic Feedback (Controllers).
- Additional functionality: Leaderboard, Cloud Storage, P2P Network, Matchmaking and VOIP, Avatars, Mixed Reality capture etc..
Only general functionality is described in this article.
Oculus Quest player prefab
During porting, the SteamVR player prefab should be renamed, for example to SteamVRPlayer. New an Oculus Quest player prefab should be created (let’s call it OculusQuestPlayer). There are at least 2 ways to add Oculus Quest support to the player’s prefab by using Oculus SDK:
- Using the Oculus SDK
OVRCameraRigprefab directly or by inheritance. This will not work for multiplayer projects without disabling and/or removingOVRManagerand other scripts. - Add all required scripts manually.
The OVRCameraRig prefab and descendants have the following structure:
OVRCameraRig, OVRManager and OVRHeadsetEmulator scripts are in the root. There is a MainCamera in CenterEyeAnchor, and its position and orientation are automatically tracked by Unity. Objects managed by the user’s hands or controllers should be placed under LeftHandAnchor and RightHandAnchor. Their position and orientation are automatically tracked by OVRCameraRig.

Oculus SDK includes basic scripts and prefabs that can be used to create scripts for managing objects by hand or controller. For example, there is LeftControllerPf, RightControllerPf and CustomHandLeft, CustomHandRight. It’s highly unlikely that those scripts or prefabs can be used as is, but it serves as a great starting point for custom implementations. For example, TouchController.cs shows how button presses can be captured and used to set controller animations:
Hand.cs shows how to animate fingers bending (Oculus Touch Controller has a capacity sensor on each button to detect finger proximity). Of course, it’s not tracking the whole wrist as LeapMotion does and it’s less accurate than Valve Index Controller. But even such finger bending animation can vastly improve immersion in the right project.
As mentioned before, OVRCameraRig can cause issues for the local player or host in multiplayer projects - when other players are spawned on the same scene with their own MainCamera, OVRCameraRig, OVRManager, etc. instances.
It turns out the whole OVRCameraRig prefab is optional and the player prefab can be created manually. To do that, the player’s camera with a MainCamera tag should be placed anywhere in the player hierarchy, and a single shared OVRManager should be placed on the scene. In this case it might be easier to copy most of the existing SteamVR player prefab. The only missing part is the controller/hand tracking which is implemented by the OVRCameraRig script. Below we’ll describe how to implement it yourself.
Basic VR functionality for SteamVR and Oculus Quest
We created a basic class VRPlayer that provides a platform independent VR interface for the whole project. All other scripts just subscribe to button press and release events (HandTriggerPressed, HandTriggerUnpressed, etc.). It also provides a platform independent haptic feedback (HandHapticPulse). SteamVRPlayer and OculusVRPlayer are both inherited from the VRPlayer class.
Please take into account that we use an older SteamVR Unity integration package and the structure and component of your integration package may be different. In any case, our SteamVRPlayer prefab has the SteamVR SteamVR_TrackedController component for each controller that updates positions and orientations and also provides the ability to subscribe to button click and unclick events.
The OculusVRPlayer class is less elegant because the Oculus SDK doesn’t provide the ability to subscribe to button press and release events:
We also added our own OVRTrackedObject script for each controller/hand to get the missing position and orientation tracking (that is otherwise provided by OVRCameraRig):
How to configure OVRManager
To run the project on Oculus Quest it’s required to have a single OVRManager instance in the scene that was configured by selecting Target Devices -> Quest for Oculus Quest.
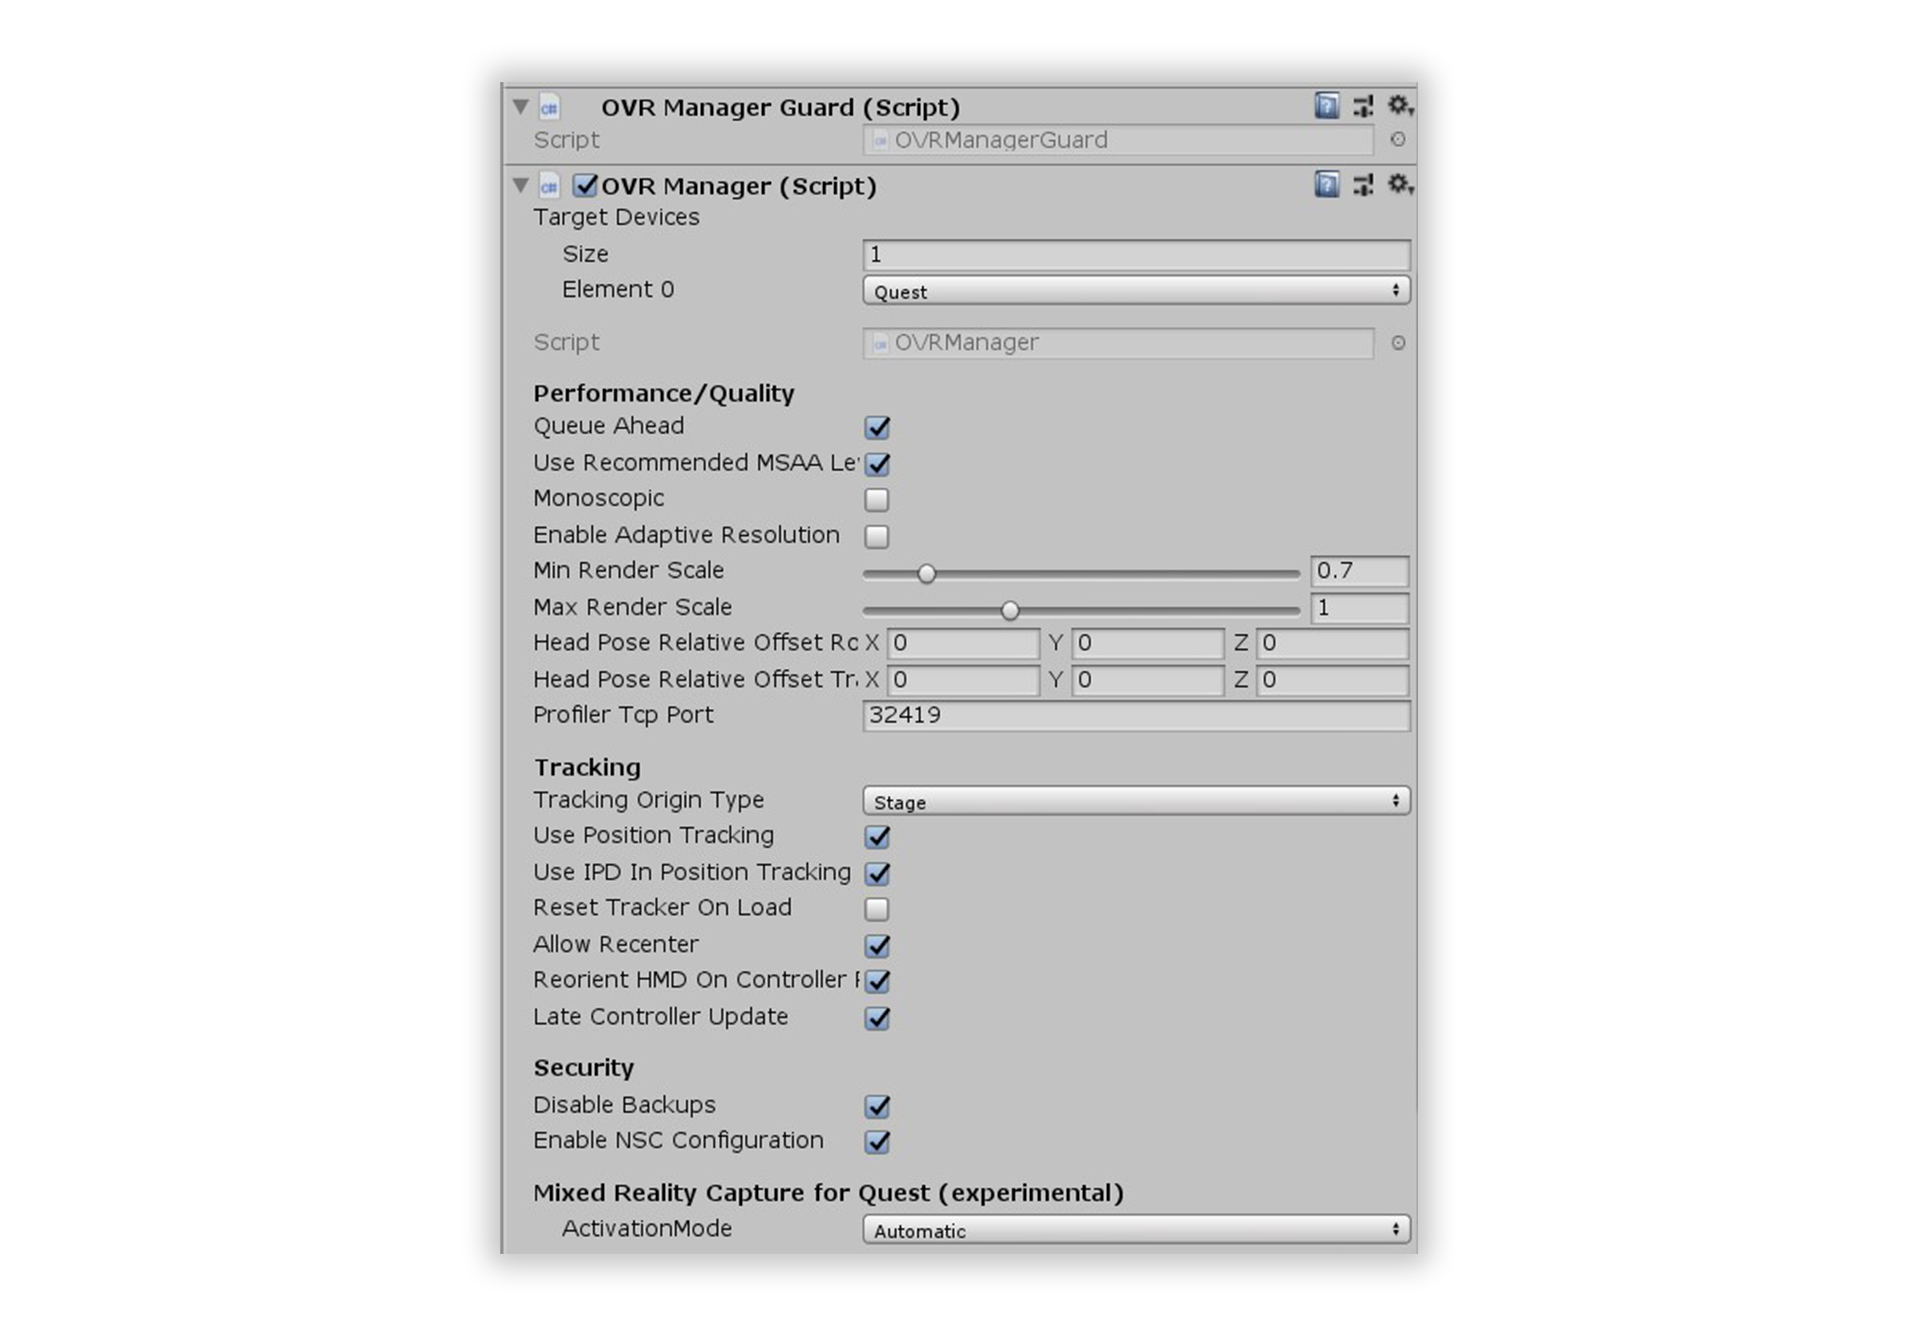
The Tracking Origin Type, Use Position Tracking, Reset Tracker On Load, Allow Recenter, Reorient HMD On Controller Recenter parameters should be set depending on the mode of locomotion and the project type:
- In case of teleport or continuous movement
Tracking Origin Typeshould be set toFloor Level.Allow RecenterandReorient HMD On Controller Recentercontrol the re-center mechanic of the Oculus Quest (which is initiated by holding the menu button).Reset Tracker On Loadalso affects the virtual game’s center on start. - In a case of bonding to play area boundaries (e.g. free-roam),
Tracking Origin Typeshould be set toStage. In that case the game’s center is always the same as the play area center; the position and rotation of HMD and controllers are not affected by Oculus Quest re-centering.
We also suggest to add the OVRManagerGuard.cs script, which disables OVRManager for other platforms:
How to spawn the player object in cross-platform multiplayer using UNET
The player prefab can be selected and the player spawned after the client reports their platform in UNET. To do so, a custom Network Manager instance should request the client’s platform by invoking NetworkServer.SendToClient. After the client responds with a custom ClientInfoMessage, you can spawn the player object using either the OculusQuestPlayer or the SteamVRPlayer prefab.
Is it possible to re-use a SteamVR config file for Oculus Quest?
If the project’s settings are stored in a config file, it’s not necessary to duplicate them using the Oculus SDK. System.IO functions work well with files stored in Application.persistentDataPath in Android/Oculus Quest (which corresponds to /storage/emulated/0/Android/data/{your app package name}/files/)
For example, in our project we use Unity AutoConfig that worked fine after a trivial fix of changing the path to the one relative to Application.persistentDataPath.
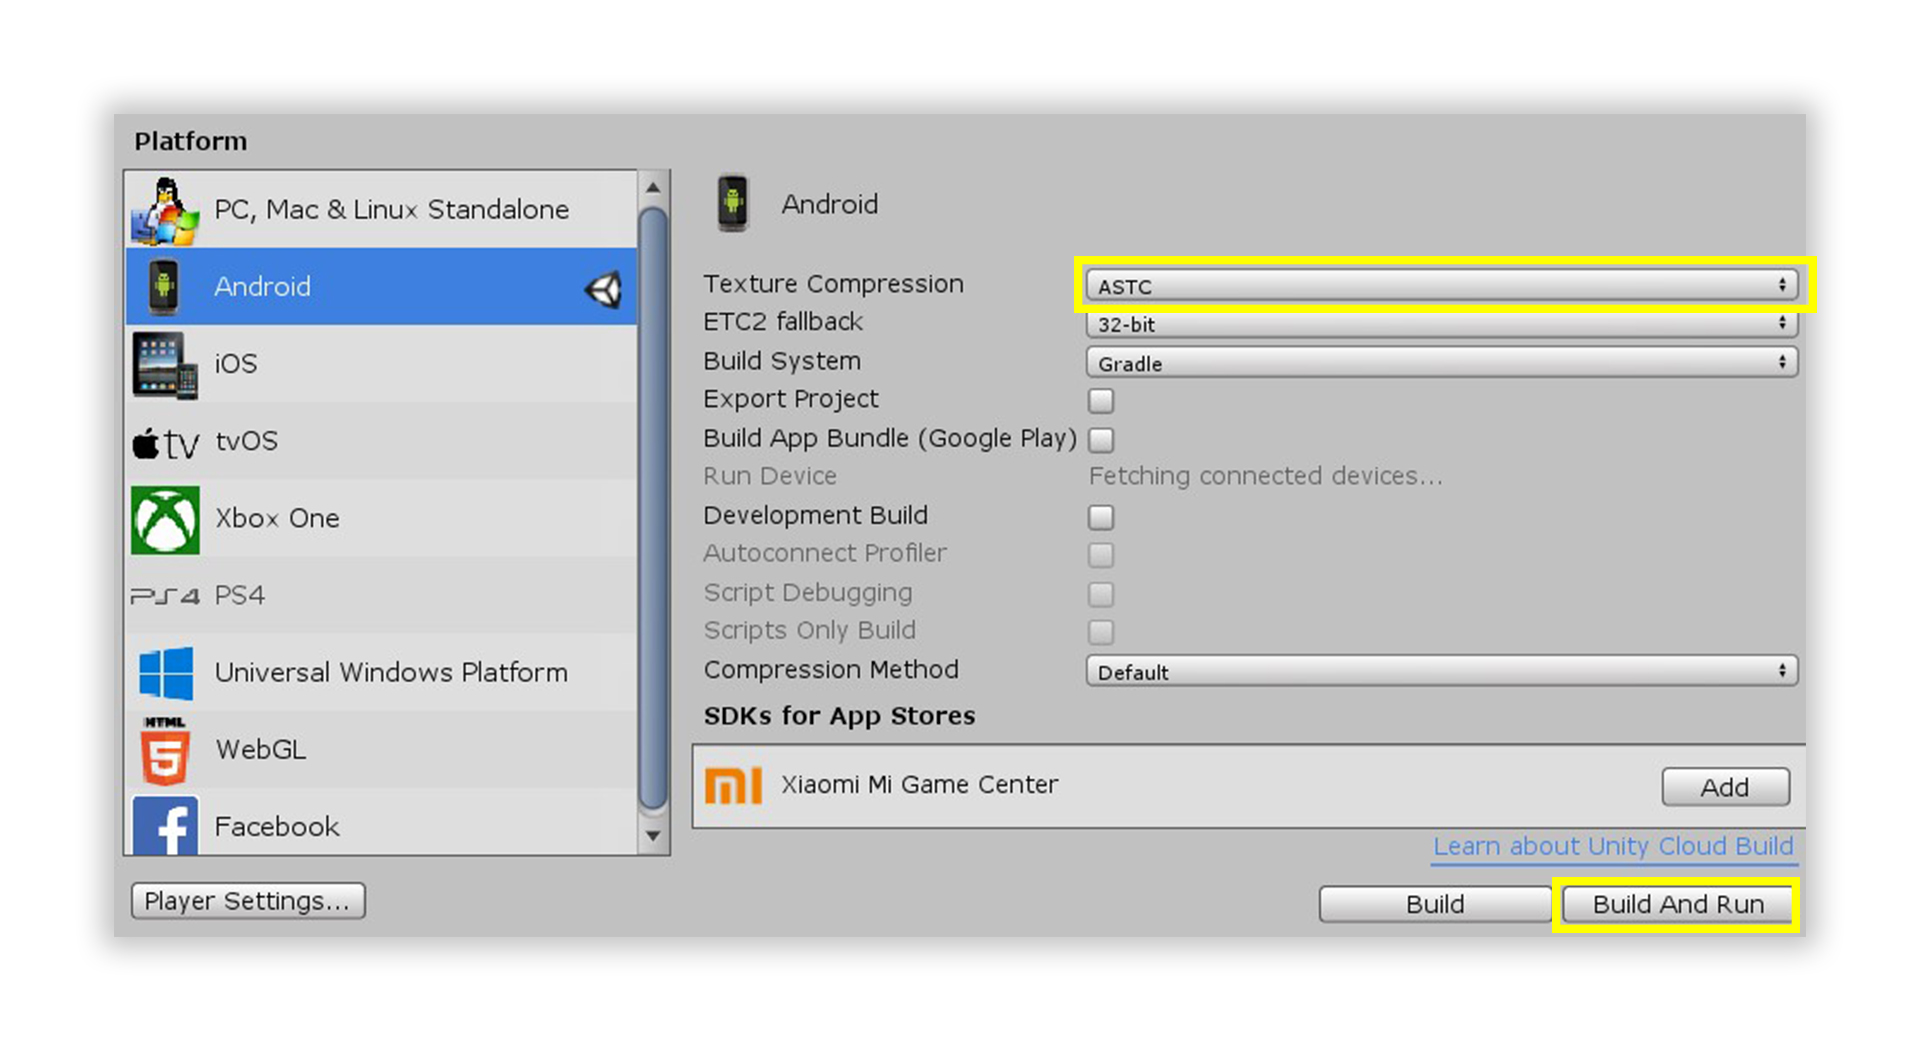
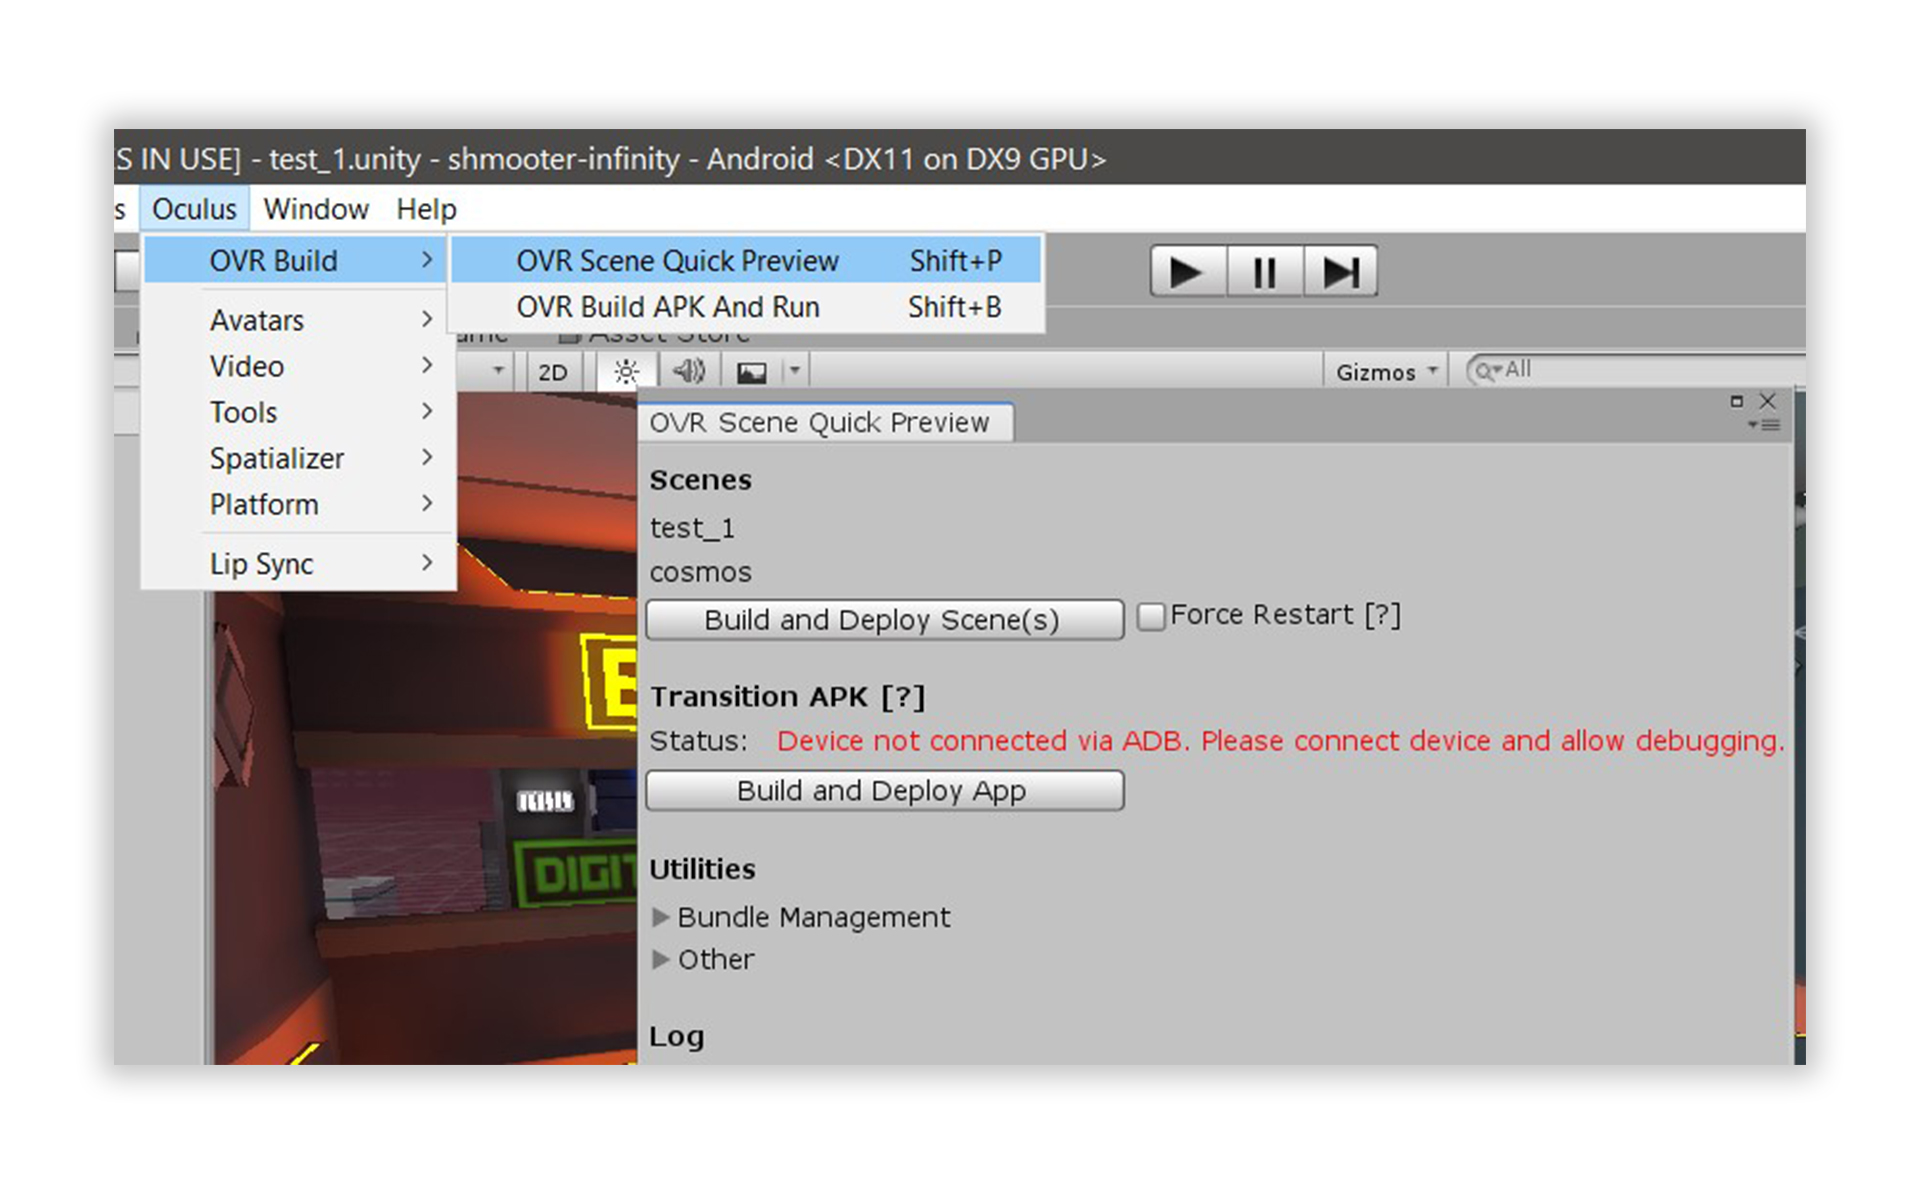
How to build and run an Oculus Quest game in Unity
First, the Android platform should be selected as the target in Unity build settings. Then, the Oculus Quest must be connected by cable to the PC before initiating Build and Run. Please note that the very first run will take significantly longer, because the textures will be compressed using Adaptive Scalable Texture Compression. During Build and Run, Unity builds the APK file, automatically installs it and runs it on the connected Oculus Quest.
Oculus SDK provides a fast incremental build option - only the delta of asset changes can be sent to the device for each build. While might be slower initially, subsequent build times should be decreased significantly. More info on that can be found here.
The last article in this series goes in depth on the topic of automated building of artifacts for both platforms. Follow to Part two.