This is the second article from the series “Porting Unity SteamVR games to Oculus Quest.” The previous one was about the actual process of porting the basic Unity SteamVR functionality to Oculus Quest.
How to test performance
As soon as the basic functionality is ported to Oculus Quest with Oculus SDK, you have to make sure the whole product is performant enough for Oculus Quest. I’m willing to bet that if your project is sufficiently complex, you’ll need to do some optimization work. In our project, we saw 15 to 40 FPS on average, even with the low-poly graphics.
Our first move was to replace all meshes with primitives, shaders with Mobile->Unlit, and to remove all additional cameras. After that, we again tested all the mechanics and scenarios and saw 70 FPS on average. It made us feel confident that spending time on optimizing the product will be beneficial, and we started to apply different optimization techniques one by one to restore all the removed graphics back.
In short, I suggest you evaluate the game’s performance on a PC and SteamVR before Oculus Quest. Simply run it using Unity Editor and position the camera in different places with different angles. It doesn’t make sense to run it on Oculus Quest if you experience any of the following:
- Less than 120 FPS
- More than 100 000 polygons
- More than 100 draw calls on frame in the Unity Statistics panel (can be estimated from SetPass calls and Batches).
You should try to reach these performance targets on the PC before continuing to Oculus Quest.
.jpg)
It’s important to know whether the performance issues are CPU-bound or GPU-bound. It’s easy to find CPU-based drops and CPU usage spikes when running the project in Unity by using the Unity Profiler. In most cases, you don’t even have to run it on the Oculus Quest because the same logic and game mechanics are shared on both platforms.
.jpg)
GPU-bound issues are trickier to debug since the product should be run on the Oculus Quest directly, and not in the Unity Editor. There are several ways you can test them. It’s possible to attach the Oculus Profiler Panel from the Oculus SDK to the running app through the local network. Also, you might want to use the simple but powerful OVR Metrics Tool overlay that is rendered on top of the running app on Oculus Quest.
.jpg)
It’s important to test the performance while the device is running with the fixed average CPU and GPU levels. That is because Oculus Quest (as a mobile platform) will dynamically change CPU and GPU frequencies based on the current load. A CPU or GPU level can be set to a value from 0-5, each value corresponding to undisclosed frequency (only these “levels” are exposed to developers). If you optimized your game to have acceptable FPS on the highest possible frequencies, it would make the hardware to overheat and discharge (Oculus Quest has active cooling). OVR Metrics Tool displays CPU and GPU levels along with the device temperature.
Optimization techniques
Regardless of how you optimize your code to run on Oculus Quest, if you have the same code for both PC SteamVR and Oculus Quest, you’ll have to introduce static changes in the project before building for Oculus Quest. We have created the OculusQuestOptimizer script for this purpose that can call Oculus Quest optimization in Unity Editor or in the build script before the final build. This script supports the following techniques:
- Disable some objects in the scene.
- Replace materials and shaders with mobile ones.
- Replace the Skybox.
It also includes various other features you can enable, depending on your needs.
Code for the Unity Editor extension:
Code of the Oculus Quest Optimizer:
Other optimization techniques were implemented individually for each gaming object or process and are enabled during runtime based on the platform (PC SteamVR or Oculus Quest). The main of these techniques (most of them are well-known optimization tricks) are described below.
Of course, some of the features in your product can be essential and thus impossible to remove, so you will have to choose and combine some of the described options. Every individual technique can save only a small amount of draw calls or polygons per frame, but when combined, they provide a substantial impact on overall performance.
Evaluate your third party plugins
Unity Asset Store has tons of ready to use components which reduce implementation effort, but at the same time, many of those plugins have bugs and are not well tested on all platforms. If you already wrote your code with performance in mind, it might be logical to first check other people’s code for the root of your troubles. You should pay special attention to patch plugins that add:
- Post-processing effects for a camera
- Additional cameras
- New CommandBuffer or commands for a camera
In our product, we found that a 3rd party plugin for decals added an additional CommandBuffer for the player’s camera, which significantly decreases performance on Oculus Quest but doesn’t affect the PC SteamVR version.
Use Occlusion Culling
It’s reasonable to assume you already use Occlusion Culling - a technique that prevents the rendering of objects which are not in the player’s camera FOV. If for some reason, you do not, it should be the first step in your optimization efforts for both PC SteamVR and Oculus Quest.
Baking lightmaps, disabling reflections and shadows
You should consider disabling reflections and shadows as one of your first moves while optimizing for Oculus Quest. Here is the OculusQuestOptimizer part responsible for disabling reflections:
We recommend not using real-time lighting in Unity for Oculus Quest. It’s better to bake lightmaps, as described here. We chose to use baked lightmaps from the beginning, so we didn’t include it in our OculusQuestOptimizer. But it’s quite easy to include the ability to switch between real-time lighting and baked lightmaps in OculusQuestOptimizer, and it would resemble the implementation for disabling reflections.
Omit some objects
I’m willing to bet that some complex objects, especially moving ones, can be omitted without significant drawbacks for your product. We used to have flying cars in the background of our scene. They helped set the atmosphere but were obviously not essentials, so we left them only in the PC SteamVR version.
.jpg)
Physics simplification
Complex physics with tons of simulated objects will significantly reduce the CPU performance, especially on the Oculus Quest. Of course, it’s easy to find the root cause of such issues by enabling/disabling physics for some objects, even on the PC SteamVR version. But the hard part here is that it might be too hard to simplify or remove the complex physics without losing the essential parts of the product.
It may be possible to bake some of the complex physics as animation and replay it on demand. Also, you might want to disable physics for faraway objects and synchronize only the final object state (for multiplayer products).
Background simplification
We use dynamic Skybox along with the dynamic weather Unity plugin to achieve a stunning atmosphere. We also have a static close-range background built from a bunch of objects.
We removed the dynamic weather from the Oculus Quest version and also baked the current dynamic Skybox and the close-range background as a Cubemap Skybox. After testing, we were surprised to notice almost no difference in visuals compared to the PC SteamVR version. So yes, dynamic weather provides better graphics, and it’s nicer to see the close-range background as is, but it turned out these effects were not essentials for our product.
.jpg "1: Evironment - Background; 2: Shade - Skybox/Cubemap")
Removing additional cameras
In order to meet the limits for polygons and draw calls per frame, it’s recommended to remove all additional cameras, leaving only the player’s camera. We have portals in the game which are used by players to go from one game area to another. Portals render the target game area to let players know what’s going on on the other side and whether it is safe to go through. Portals are implemented by using additional cameras.
Unfortunately, we were forced to replace the camera effect with a simple half-transparent texture with a shader that simulates waves on the surface. Here is the PC SteamVR portal version on the left and the Oculus Quest portal’s version on the right.
.jpg)
Disabling or replacing effects
It’s impossible to use Single Pass rendering and Post-Processing at the same time on Oculus Quest. But Single Pass is the highly preferred rendering mode, so we were forced to sacrifice Post-Processing in the player prefab. We had the Post-Processing based Bloom and low saturation effect. The low saturation is used as the dead player effect in the PC SteamVR version.
We completely removed the Bloom effect from the Oculus Quest version. The dead player Post-Processing effect was replaced by a half-transparent grayscale texture that was added in front of the player’s eyes (camera) every time he died. I suppose other Post-Processing effects can be effectively replaced the same way.
Alternative materials and shaders
Oculus Quest is a mobile platform, so most standard desktop shaders have worse performance. Unity has some simple embedded mobile shaders, as does the Oculus SDK. Nevertheless, we were forced to write our own mobile shaders to cover the glow and transparent effects.
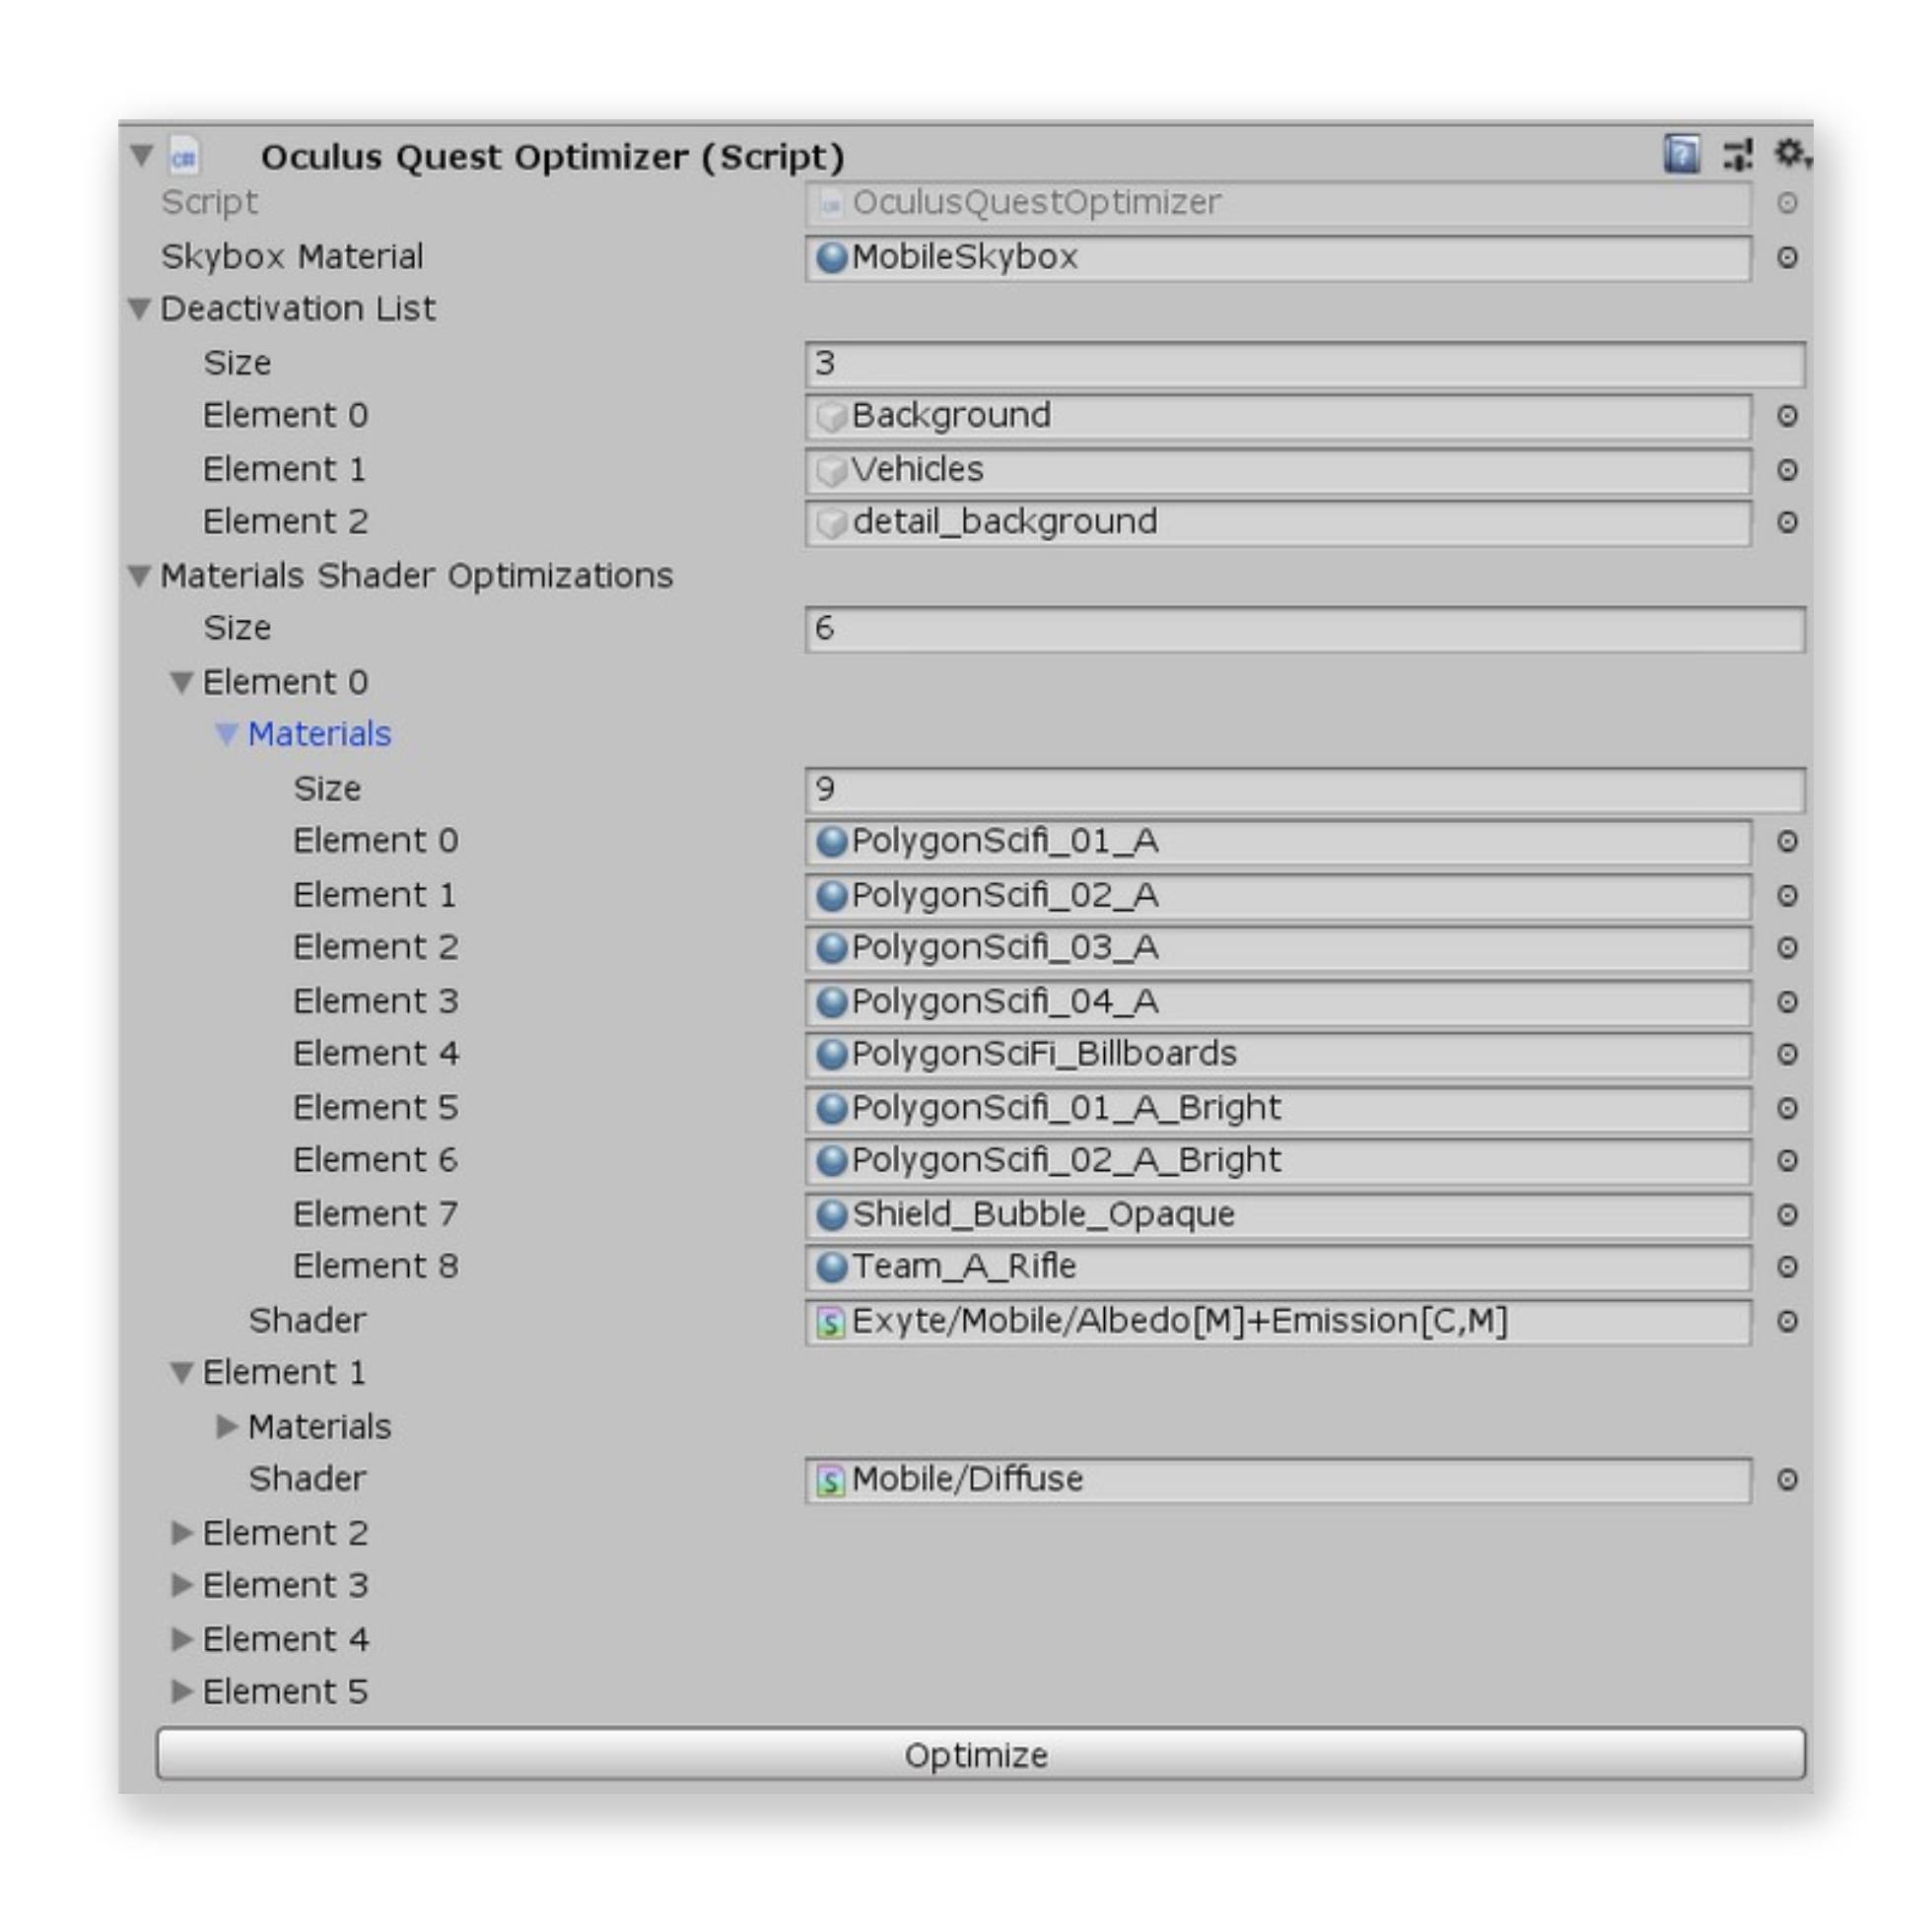
Oculus Quest shaders can be easily toggled for all specified materials in OculusQuestOptimizer:
.jpg)
Mesh simplifying
We were already using low-poly objects, so we didn’t have to do anything tricky to reach the 100 000 poly per frame target. Anyway, it’s possible to overcome the high-poly challenge by creating LODs or even replacing the whole mesh with a low low-poly version created specifically for the Oculus Quest.
Such low-poly meshes can be created by any 3D modeler or by using a Unity plugin Mesh Simplify. The meshes can be replaced in OculusQuestOptimizer the same way as for shaders/materials.
FFR: Fixed Foveated Rendering
Fixed Foveated Rendering is a powerful Oculus optimization that can significantly decrease the mobile GPU load by rendering a low-quality image in a peripheral frame on demand. So the image is rendered as usual in the center but with low quality in a peripheral. Such frames are almost invisible during gameplay, even without eye-tracking capabilities (which is not available on Oculus Quest).
To enable or disable this optimization on the fly, you need to switch OVRManager.fixedFoveatedRenderingLevel value to Off, Low, Medium, High or HighTop. Each level increases the width of the peripheral frame, making it more visible. We decided to use the fixed Low FFR level indefinitely, since it’s hard to notice but gives a good performance boost. I suppose there are a bunch of places suitable for different FFR levels in most games. You may find more about FFR in the doc.
Conclusion
Using this diverse set of optimization techniques, we increased performance from an average of 40 FPS with drops down to 15 FPS to 70-72 average FPS without any drop. That is measured for CPU and GPU levels 3 (rarely 4), without Oculus Quest, overloading and overheating.
In the end, we didn’t sacrifice any essential features and preserved the shared codebase. Most of our users who already tried the PC SteamVR version said the product looked the same on Oculus Quest.
We finish this series of articles about porting Unity SteamVR games to Oculus Quest with an article “Automated artifact building both for SteamVR and Oculus Quest.” You can read the first part, Porting basic Unity SteamVR game's functionality to Oculus Quest, here.